Node + NAPI 实现 C++ 扩展 - LRU 淘汰算法

前言
前段实践了一下 Node 的 C++ 编写,对于底层的编程实践是每个程序员心中所向往的圣地。由于接触的 Node C++ 的时间比较少,可能还无法完全理解其中的精髓,但是本文只记录自己的一个实践。
先来看看 Node Addons 在整个模块中的所处的位置。


Addons 是用 C ++编写的动态链接的共享对象。 require() 函数可以将 Addons 加载为普通的Node.js模块,Addons 提供 JavaScript 和 C / C ++ 库之间的接口。
插件编写方式
在现代,Node 官方推荐的方式为以下三种, 插件编写历史可以查看 a href="https://cnodejs.org/topic/5957626dacfce9295ba072e0">《从暴力到 NAN 再到 NAPI——Node.js 原生模块开发方式变迁》
- 1.NAN (一个充满宏和实用工具的头文件,使Node.js的插件开发在0.8、0.10、0.12、1、2、3、4、5、6、7、8、9、10、11、12和13版本之间更容易。)
- 2.NAPI (N-API(在字母中发音为N,后跟API)是用于构建本机插件的API。 它独立于底层JavaScript运行时(例如V8),并作为Node.js本身的一部分进行维护。)
- 3.直接使用内部的 V8、Libuv 和 Node.js库(需要掌握 V8, libuv, Node 原生库方法,Node.js包括其他静态链接的库,包括OpenSSL )
如果你不使用 NAPI 的未公开的 API,优先使用 NAPI 进行插件开发。
NAN 和 NAPI 的区别
NAN 解决了混乱的C++原生模块,不再让一个模块只能被若干个 Node 版本使用,而提出使用宏定义来解决这个问题,所以说NAN是一大堆宏定义,兼容各种 Node 版本的宏定义。做到了一次编写,到处编译。
而这种设计模式还是依然有缺点,那就是多次编译,也就是说你写的插件如果到了更高的 Node 版本,还是需要再次编译,因此有来额 NAPI,它旨在使 Addons 与基础 JavaScript 引擎的更改保持隔离,并使为一个主要版本编译的模块可以在 Node 的更高主要版本上运行,而无需重新编译。
随着时代的前进,我当然选择了最新的 NAPI 进行实践,虽然最新的 API 的封装地非常友好,看起来编写已经不是那么复杂,但是对于深入理解V8 以及Node原生模块来说,提升没有从更下层编写来的大。不过,这也不妨碍我们的学习,我们先来看看上层的实践,快速搭建应用,然后慢慢地去理解整个过程,也是一个非常好的方式。
还有一点就是,N-API是一个 C API,确保 ABI 跨Node.js版本和不同编译器级别的稳定性。C++ API更容易使用。为了支持使用 C++,该项目维护了一个名为 node-addon-api 的 C++ 包装器模块。因此我们会使用进行包装后的 node-addon-api 来进行开发。
本文使用的环境
> g++ --verison
Configured with: --prefix=/Applications/Xcode.app/Contents/Developer/usr --with-gxx-include-dir=/Applications/Xcode.app/Contents/Developer/Platforms/MacOSX.platform/Developer/SDKs/MacOSX10.14.sdk/usr/include/c++/4.2.1
Apple LLVM version 10.0.0 (clang-1000.11.45.5)
Target: x86_64-apple-darwin18.0.0
Thread model: posix
InstalledDir: /Applications/Xcode.app/Contents/Developer/Toolchains/XcodeDefault.xctoolchain/usr/bin

> node -v
v10.16.0

> sw_vers
ProductName:    Mac OS X
ProductVersion: 10.14
ProductName:    Mac OS X
ProductVersion: 10.14
BuildVersion:   18A391
LRU算法介绍
既然要实现一个 LRU,那必须对这个算法有一个初步的了解。LRU(Least Recently Used 意思为 最近最少使用)
以内存访问为例解释缓存的工作原理。假设缓存的大小固定,初始状态为空。每发生一次读内存操作,首先查找待读取的数据是否存在于缓存中,若是,则缓存命中,返回数据;若否,则缓存未命中,从内存中读取数据,并把该数据添加到缓存中。向缓存添加数据时,如果缓存已满,则需要删除访问时间最早的那条数据,这种更新缓存的方法就叫做LRU。
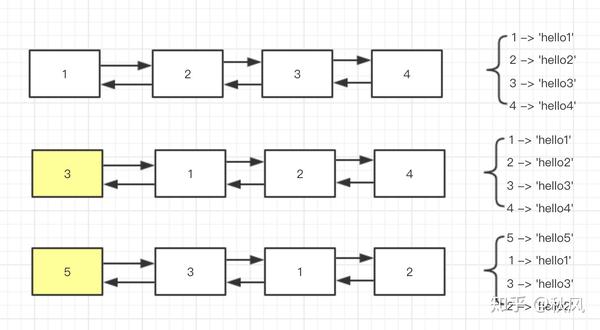
可以用以下图来进行演示说明,假设我们最多只能开3个应用,第一次我们开了知乎,然后知乎为最近使用,第二次,我们点击了qq音乐,然后我们的qq音乐会成为最近使用的应用。最后我们又打开了美团,此时爱奇艺应用被删除,美团成为最近使用的应用。


为了实现 LRU,我们需要保证他的读写性能。理想状态为在 O(1) 的时间内读取或者更新一条数据。通过这个现象我们可以使用 HashMap 来实现这个存储,根据键值访问可以达到 O(1) 的速度。现在还差更新数据,由于我们需要确定最早的那条数据,所以我们需要遍历所有数据。
首先我们可以想到链表是一种有顺序的数据结构,其次由于我们被访问的数据有可能为非首尾结点,所以我们需要使用双向链表,来保证我们可以从中间任意结点修改链表。
现在我们确定了我们的数据结构为 HashMap + 双向链表。
我用图来描述一下整个过程,假设我们总长度为4。(左侧为双向链表,右侧为HashMap)

C++实现
由于一开始对 Node Addons 不太了解,因此先写了一个 c++ 版本,方便逻辑的调试。
list.h
#include <stdio.h>
#include <unordered_map>
#include <string>
using namespace std;

class Node {
public:
    string data;
    Node *next;
    Node *prev;
    Node(string da, Node *p = NULL) {
        this->data = da;
        this->next = p;
    }
};
class List {
private:
    Node *head, *tail;
    int position;
    int count = 0;
    int maxCount = 200;
    unordered_map <string, string> cachemap;
public:
    List() {
        head = tail = NULL;
    };
    void SetMax(int da);
    void Print();
    void Insert (string da, string value);
    void Delete(string da);
    void Search(string da);
};
list.cpp
#include <iostream>
#include "list.hpp"
#include <string>
#include <unordered_map>

using namespace std;

void List::SetMax(int da) {
    maxCount = da;
}

void List::Print() {
    Node *p = head;

    while(p != NULL) {
        string key = p->data;
        unordered_map<string ,string >::iterator l_it;
        l_it = this->cachemap.find(key);

        if(l_it != this->cachemap.end()) {
            cout << l_it->second << endl;
        }
        p = p->next;
    }
}

void List::Delete(string da) {
    Node *p = head, *q = head;
    if(p == NULL) {
        cout << "can't find value %d" << da << endl;
        return;
    }
    string value = "";
    while (p != NULL) {
        if(p->data == da) {
            value = da;
            break;
        }
        q = p;
        p = p->next;
    }
    if(p == NULL) {
        cout << "del can't find value " << da << endl;
    } else {
        q->next = p->next;
        cout << "del value " << da << endl;
    }
}

void List::Insert(string da, string value) {
    if(count >= maxCount) {
        tail->prev->next = NULL;
        tail = tail->prev;

        Node *p = new Node(da);
        cachemap.insert(pair<string, string>(da, value));
        p->next = head;
        head->prev = p;
        head = p;
        head->prev = NULL;

        return;
    }
    if(head == NULL) {
        head = tail = new Node(da);
        cachemap.insert(pair<string, string>(da, value));
        head->next = NULL;
        head->prev = NULL;
        tail->next = NULL;
        tail->prev = NULL;
    } else {
        Node *p = new Node(da);
        cachemap.insert(pair<string, string>(da, value));
        head->prev = p;
        p->next = head;
        p->prev = NULL;
        head = p;
    }
    count++;
}

void List::Search(string da) {
    Node *p = head;
    if(p == NULL) {
        cout << "can't find" << endl;
        return;
    }
    int count = -1;
    int i = 0;
    while( p!= NULL ) {
        if(p->data == da) {
            count = i;
            break;
        }
        p = p->next;
        i ++;
    }
    if(count != -1) {
        p->prev->next = p->next;
        if(p->next != NULL) {
            p->next->prev = p->prev;
        }
        p->next = head;
        p->prev = NULL;
        head->prev = p;
        head = p;
        unordered_map<string ,string >::iterator l_it;
        l_it = this->cachemap.find(da);
        if(l_it == this->cachemap.end()) {
            cout << "can't find key " << da << endl;
        } else {
            cout << "find value is " << l_it->second << endl;
        }
    } else {
        cout << "can't find key" << da << endl;
    }
}
Node Addons 设计实现
功能
1.设置缓存长度
2.获取缓存长度
3.打印所有缓存数据
4.插入缓存数据
5.获取缓存数据
项目结构
├── binding.gyp      // 编译配置
├── package.json
├── src
│   ├── bingding.cc  // 声明模块导出
│   ├── list.cc      // 主入口
│   └── list.h       // 头文件声明
└── index.js         // 主文件入口
步骤
初始化
npm init -y创建binding.gpy
{
  "targets": [
    {
      "target_name": "LRU_node_addon",
      "cflags!": [ "-fno-exceptions" ],
      "cflags_cc!": [ "-fno-exceptions" ],
      "sources": [ "./src/bingding.cc", "./src/list.cc" ],
      "include_dirs": [
        "<!@(node -p \"require('node-addon-api').include\")"
      ],
      'defines': [ 'NAPI_DISABLE_CPP_EXCEPTIONS' ],
    }
  ]
}
下载依赖
npm i bindings node-addon-api -S注: bingding 是用来引入 c++ 模块,node-addon-api 是 NAPI 的 c++ 封装
导出模块
NAN模块的初始化是交给 Node.js 提供的宏来实现的:
NODE_MODULE(addon, init)而N-API使用自己的宏定义(NAPI_MODULE),因为我们使用node-addon-api,所以它也对这个宏定义包裹成下面这个了:
NODE_API_MODULE(addon, Init)编写我们的导出模块 http://binding.cc
#include <napi.h>
#include "list.h"


Napi::Object InitAll(Napi::Env env, Napi::Object exports) {
  return List::Init(env, exports);
}

NODE_API_MODULE(NODE_GYP_MODULE_NAME, InitAll)
改造主逻辑
做完了上述的准备工作,就可以开始改造我们的主逻辑,转化为 Node Addons ,主要还是因为 Node 无法直接调用 c++, 因此需要经过包装,我们的主要任务就是将 c++ 的类型包装为 v8 的类型,这一部分 node-addon-api 已经封装好,我们直接使用即可。(主要我写的这个比较简单,没有用到特别复杂的特性,主要作为一个小小的实践。)
修改声明文件
这里主要是对函数的返回值以及入参进行修改。
入参: Napi::CallbackInfo 主要为js 调用时传入的请求参数。
返回值: Napi::Value是 js 值的C ++表示。
...
class List : public Napi::ObjectWrap<List>{
private:
    Node *head, *tail;
    int count = 0;
    int maxCount = 200;
    unordered_map <string, string> cachemap;
public:
    static Napi::Object Init(Napi::Env env, Napi::Object exports); // 初始化
    static Napi::FunctionReference constructor; // 创建 FunctionReference ,防止被垃圾回收
    List(const Napi::CallbackInfo& info); // 类构造函数
    void SetMax(const Napi::CallbackInfo& info);
    Napi::Value getMax(const Napi::CallbackInfo& info);
    Napi::Value Print(const Napi::CallbackInfo& info);
    void Insert (const Napi::CallbackInfo& info);
    Napi::Value Search(const Napi::CallbackInfo& info);
}
...
设置缓存长度
通过对 info 参数来获取 js 传入的参数。增加一些类型判断,如果非数字则想 js 抛出错误。
void List::SetMax(const Napi::CallbackInfo& info) {
    int length = info.Length();
    Napi::Env env = info.Env();
     if (length <= 0 || !info[0].IsNumber()) {
        Napi::TypeError::New(env, "Number expected").ThrowAsJavaScriptException();
    }
    Napi::Number value = info[0].As<Napi::Number>();
    int cvalue = value.Int32Value();
    if(cvalue < 10) {
        Napi::TypeError::New(env, "min count is 10").ThrowAsJavaScriptException();
    }
    this->maxCount = cvalue;
}
获取缓存长度
修改返回值为 Napi::Value 统一方式。
Napi::Value List::getMax(const Napi::CallbackInfo& info) {
    int num = this->maxCount;
    return Napi::Number::New(info.Env(), num);
}
打印所有缓存数据
通过对链表的迭代,获取所有数据并创建 Napi::Array 来进行存储。最后返回。
Napi::Value List::Print(const Napi::CallbackInfo& info) {
    // array https://github.com/nodejs/node-addon-api/issues/423
    Node *p = this->head;
    Napi::Array arr = Napi::Array::New(info.Env(), this->count);
    int i = 0;
    while(p != NULL) {
        string key = p->data;
        unordered_map<string ,string >::iterator l_it;
        l_it = this->cachemap.find(key);

        if(l_it != this->cachemap.end()) {
            arr[i] = Napi::String::New(info.Env(), l_it->second);
        }
        i++;
        p = p->next;
    }
    return arr;
}
插入缓存数据
修改点也比较少,主要就是
info[0].As<Napi::String>()
info[1].As<Napi::String>()
用来获取 js 传入的参数,其他就是正常的数据类型改造。
void List::Insert(const Napi::CallbackInfo& info) {
    int length = info.Length();
    Napi::Env env = info.Env();

     if (length <= 1 || !info[0].IsString() || !info[1].IsString()) {
        Napi::TypeError::New(env, "key and value expected").ThrowAsJavaScriptException();
    }
    Napi::String key = info[0].As<Napi::String>();
    Napi::String value = info[1].As<Napi::String>();

    string da = key.ToString();

    if(this->count >= this->maxCount) {
        this->tail->prev->next = NULL;
        this->tail = this->tail->prev;

        Node *p = new Node(da);
        this->cachemap.insert(std::pair<string, string>(da, value));
        p->next = this->head;
        this->head->prev = p;
        this->head = p;
        this->head->prev = NULL;

        return;
    }
    if(this->head == NULL) {
        this->head = this->tail = new Node(da);
        this->cachemap.insert(std::pair<string, string>(da, value));
        this->head->next = NULL;
        this->head->prev = NULL;
        this->tail->next = NULL;
        this->tail->prev = NULL;
    } else {
        Node *p = new Node(da);
        this->cachemap.insert(std::pair<string, string>(da, value));
        this->head->prev = p;
        p->next = this->head;
        p->prev = NULL;
        this->head = p;
    }
    this->count++;
}
获取缓存数据
获取到 js 传入 key 的后,通过循环链表查找是否存在改 key值,如果存在就去 map 中获取 value
Napi::Value List::Search(const Napi::CallbackInfo& info) {
    int length = info.Length();
    Napi::Env env = info.Env();

     if (length <= 0 || !info[0].IsString()) {
        Napi::TypeError::New(env, "String expected").ThrowAsJavaScriptException();
    }
    Napi::String value = info[0].As<Napi::String>();
    string da = value.ToString();

    Node *p = this->head;

    if(p == NULL) {
        return Napi::String::New(info.Env(), INITVALUE);
    }

    int count = -1;
    int i = 0;

    while( p!= NULL) {
        if(p->data == da) {
            count = i;
            break;
        }
        p = p->next;
        i ++;
    }
    if(count != -1) {
        p->prev->next = p->next;
        if(p->next != NULL) {
            p->next->prev = p->prev;
        }
        p->next = this->head;
        p->prev = NULL;
        this->head->prev = p;
        this->head = p;
        unordered_map<string ,string >::iterator l_it;
        l_it = this->cachemap.find(da);
        if(l_it == this->cachemap.end()) {
            return Napi::String::New(info.Env(), INITVALUE);
        } else {
            return Napi::String::New(info.Env(), l_it->second);
        }

    } else {
        return Napi::String::New(info.Env(), INITVALUE);
    }
    return Napi::String::New(info.Env(), INITVALUE);
}
如何运行
打包模式
node-gyp configure && node-gyp build调试模式
node-gyp configure && node-gyp build --debug通过 node-gyp 编译后, 会出现对应的 build 目录,打包模式 build 下面会有 一个 Release 目录,调试模式则是 Debug 目录。
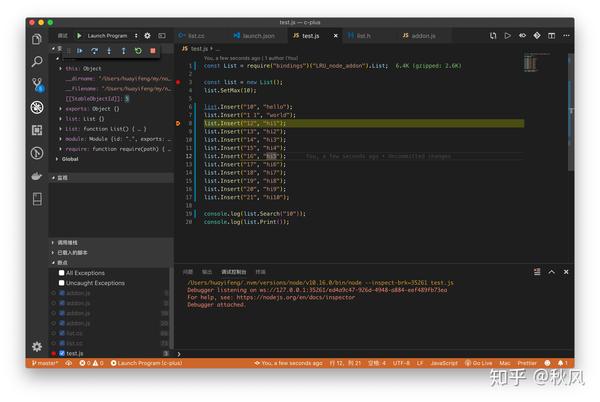
运行测试文件 test.js
const List = require("bindings")("LRU_node_addon").List;

const list = new List();
list.SetMax(10);

list.Insert("10", "hello");
list.Insert("11", "world");
list.Insert("12", "hi1");
list.Insert("13", "hi2");
list.Insert("14", "hi3");
list.Insert("15", "hi4");
list.Insert("16", "hi5");
list.Insert("17", "hi6");
list.Insert("18", "hi7");
list.Insert("19", "hi8");
list.Insert("20", "hi9");
list.Insert("21", "hi10");

console.log(list.Search("10"));
console.log(list.Print());
output
由于设置缓存最长长度为10,因为已经查找不到 "10" 这个 key 了。
>
>[ 'hi10',
  'hi9',
  'hi8',
  'hi7',
  'hi6',
  'hi5',
  'hi4',
  'hi3',
  'hi2',
  'hi1' ]
如何调试
以下都是基于 vscode 进行调试。
调试 Node
创建 .vscode/launch.json, 添加以下配置。preLaunchTask 为调试前运行的命令,保证每次调试的都是 最近的 c++ 扩展代码。(也可以去除这个文件)
{
        "type": "node",
        "request": "launch",
        "name": "JS Debug Build",
        "console": "integratedTerminal",
        "program": "${workspaceFolder}/test.js",
        "preLaunchTask": "npm: build:debug"
}
然后打上两个断点,在调试面板 找到 JS Debug Build。单击运行,就可以看到效果了。

调试 c++
vscode 默认不支持 c/c++ 的调试,先安装 c/c++ 插件。


添加配置
{
        "name": "(lldb) Launch",
        "type": "cppdbg",
        "request": "launch",
        "program": "/Users/huayifeng/.nvm/versions/node/v10.16.0/bin/node",
        "cwd": "${workspaceFolder}",
        "args": [
            "${workspaceFolder}/test.js"
        ],
        "MIMode": "lldb",
},
给 list.cc 打上断点。在调试面板 找到 (lldb) Launch。单击运行,就可以看到效果了。


如何发布
包版本管理
根据语义化版本管理(semantic-version)https://docs.npmjs.com/about-semantic-versioning
这里可以看我的另一个包 https://github.com/zerolty/auto-version 帮助你更好地管理版本。
为了帮助开发人员管理好依赖代码,我们建议你从 1.0.0 作为初始版本进行迭代。
| Code status | Stage | Rule | Example version | | ----------------------------------------- | ------------- | ------------------------------------------------------------ | --------------- | | First release | New product | Start with 1.0.0 | 1.0.0 | | Backward compatible bug fixes | Patch release | Increment the third digit | 1.0.1 | | Backward compatible new features | Minor release | Increment the middle digit and reset last digit to zero | 1.1.0 | | Changes that break backward compatibility | Major release | Increment the first digit and reset middle and last digits to zero | 2.0.0 |
上述表格摘自 npm ,懒得翻译了。。。
定义入口
package.json
{
  "name": "lru-node-addon",
  "version": "1.0.0",
  "description": "",
  "scripts": {
    "build:debug": "node-gyp configure && node-gyp build --debug",
    "build:release": "node-gyp configure && node-gyp build"
  },
  "main": "index.js",
  "files": ["src", "index.js", "binding.gyp"],
  "gypfile": true,
  "dependencies": {
    "bindings": "~1.2.1",
    "node-addon-api": "^1.0.0"
  }
}
发布
npm publish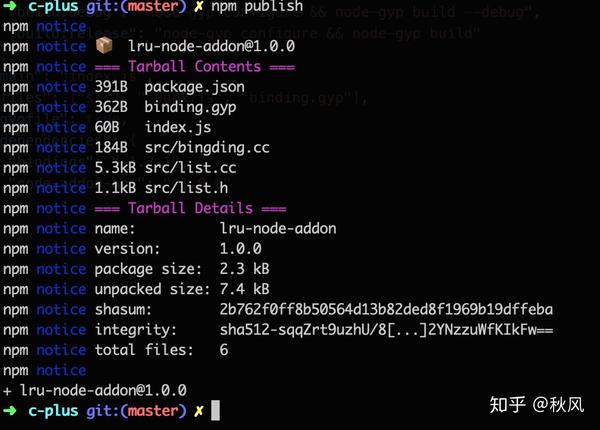

比较效率
时间
| | 100 | 1000 | 10000 | | ----- | ------- | ------- | --------- | | Node | 1.828ms | 3.264ms | 42.393ms | | Addon | 0.605ms | 5.953ms | 525.639ms |
内存使用(heapUsed)
| | 100 | 1000 | 10000 | | ----- | ------ | ------ | ------ | | Node | 3.96MB | 4.46MB | 6.72MB | | Addon | 3.90MB | 4.23MB | 5.45MB |
测试发现随着数量的增加。用原生的 node 速度更快一些,但是内存占用更多。。 。这个回头再写一篇研究一下。还没有具体分析。。。
以上所有示例的 github 地址
https://github.com/hua1995116/LRU-node-addon
参考
https://juejin.im/post/5de484bef265da05ef59feb5
https://www.jianshu.com/p/b1ab4a170c3c
https://cnodejs.org/topic/5957626dacfce9295ba072e0
https://github.com/nodejs/node-addon-api
https://gyp.gsrc.io/docs/UserDocumentation.md
https://www.ibm.com/developerworks/cn/opensource/os-cn-v8engine/
https://nodejs.org/dist/latest/docs/api/n-api.html
欢迎关注


交流群