Spring知识点2

IDEA中格式化代码快捷键 https://blog.csdn.net/miao_9/article/details/64502553?utm_source=blogxgwz4
Spring系列之Spring常用注解总结 Spring系列之Spring常用注解总结 - 平凡希 - 博客园
史上最全spring注解,没有之一 https://blog.csdn.net/weixin_39805338/article/details/80770472
Spring的连接数据库以及JDBC模板(实例讲解) Spring的连接数据库以及JDBC模板(实例讲解)_java_脚本之家
Spring 事务 学习 Spring 事务 学习
Spring事务管理及几种简单的实现 https://blog.csdn.net/zhuxinquan61/article/details/71075051
@Transactional(rollbackFor=Exception.class)的使用 https://blog.csdn.net/weixin_34929338/article/details/80285108
spring-aop jar包需求 https://blog.csdn.net/zh199609/article/details/79710930
Java AOP nested exception is java.lang.NoClassDefFoundError: org/aopalliance/aop/Advice || Error creating bean with name 'org.springframework.aop.aspectj.AspectJPointcutAdvisor#0' 两个异常解决办法 Java AOP nested exception is java.lang.NoClassDefFoundError: org/aopalliance/aop/Advice || Error creating bean with name 'org.springframework.aop.aspectj.AspectJPointcutAdvisor#0' 两个异常解决办法 - 韩思明 - 博客园
Intellij idea 插件安装和卸载 https://blog.csdn.net/qq_28289405/article/details/81302169
Intellij Idea get/set方法快捷键 https://blog.csdn.net/u011206991/article/details/51151437
Spring Hello World 实例 Spring Hello World 实例
ApplicationContext context = new ClassPathXmlApplicationContext("Beans.xml");
<bean id="helloWorld" class="com.spring.demo1.HelloWorld">
<property name="message" value="cgm"/>
</bean>
Spring 提供了以下两种不同类型的容器:1)Spring BeanFactory 容器 2)Spring ApplicationContext 容器
1)Spring BeanFactory 容器,是已经过时的容器了,不要使用
XmlBeanFactory context = new XmlBeanFactory(new ClassPathResource("spring.xml"));
2)Spring ApplicationContext 容器
FileSystemXmlApplicationContext:该容器从 XML 文件中加载已被定义的 bean。在这里,你需要提供给构造器 XML 文件的完整路径。
ClassPathXmlApplicationContext:该容器从 XML 文件中加载已被定义的 bean。在这里,你不需要提供 XML 文件的完整路径,只需正确配置 CLASSPATH 环境变量即可,因为,容器会从 CLASSPATH 中搜索 bean 配置文件。
WebXmlApplicationContext:该容器会在一个 web 应用程序的范围内加载在 XML 文件中已被定义的 bean。
举例:
ApplicationContext context = new FileSystemXmlApplicationContext("D:\\git_code\\spring33\\src\\spring.xml");
bean 定义包含称为配置元数据的信息,下述容器也需要知道配置元数据:
<bean id="xx" name="xx" class="xx" scope="xx" lazy-init="xx" init-method="xx" destroy-method="xx" autowire="xx">
<property name="message" value="cgm"/>
<constructor-arg name="xx" value="xx"/>
</bean>
有下面三个重要的方法把配置元数据提供给 Spring 容器:
基于 XML 的配置文件
基于注解的配置
基于 Java 的配置
Spring Bean 作用域
singleton 在spring IoC容器仅存在一个Bean实例,Bean以单例方式存在,默认值
prototype 每次从容器中调用Bean时,都返回一个新的实例,即每次调用getBean()时,相当于执行newXxxBean()
Bean 的生命周期
理解 Spring bean 的生命周期很容易。当一个 bean 被实例化时,它可能需要执行一些初始化使它转换成可用状态。
同样,当 bean 不再需要,并且从容器中移除时,可能需要做一些清除工作。
init-method 属性指定一个方法,在实例化 bean 时,立即调用该方法。
同样,destroy-method 指定一个方法,只有从容器中移除 bean 之后,才能调用该方法。
Bean的生命周期可以表达为:Bean的定义——Bean的初始化——Bean的使用——Bean的销毁
<bean id="helloWorld" class="com.spring.demo1.HelloWorld" init-method="myStart" destroy-method="myEnd" scope="prototype">
<property name="message" value="cgm"/>
</bean>
idea怎么添加override/implement Methods idea怎么添加override/implement Methods
Spring Bean 后置处理器
Bean 后置处理器允许在调用初始化方法前后对 Bean 进行额外的处理。
public class InitHelloWorld implements BeanPostProcessor {
@Override
public Object postProcessBeforeInitialization(Object o, String s) throws BeansException {
System.out.println("before new bean");
return o;
}
@Override
public Object postProcessAfterInitialization(Object o, String s) throws BeansException {
System.out.println("after new bean");
return o;
}
}
Spring Bean 定义继承
<bean id="fruit" class="com.spring.demo1.Fruit">
<property name="message1" value="fruit 1"/>
<property name="message2" value="fruit 2"/>
</bean>
<bean id="apple" class="com.spring.demo1.Apple" parent="fruit">
<property name="message1" value="apple 1"/>
<property name="message3" value="apple 3"/>
</bean>
Spring 依赖注入
有2种方法:1)无参构造函数+Setter方法 2)有参数构造函数
1)无参构造函数+Setter方法
<bean id="helloWorld" class="com.spring.demo1.HelloWorld">
<property name="message" value="cgm"/>
</bean>
public class HelloWorld {
private String message;
public void setMessage(String message) {
this.message = message;
}
public String getMessage() {
return message;
}
}
2)有参数构造函数
<bean id="helloWorld" class="com.spring.demo1.HelloWorld">
<constructor-arg name="message" value="cgm"/>
</bean>
public class HelloWorld {
private String message;
public HelloWorld(String message) {
this.message = message;
}
}
Spring 注入内部 Beans
<bean id="box" class="com.spring.demo1.Box">
<property name="apple">
<bean id="apple" class="com.spring.demo1.Apple">
</bean>
</property>
</bean>
Spring 注入集合
<bean id="helloWorld" class="com.spring.demo1.HelloWorld">
<property name="message" value="cgm"/>
<property name="myList">
<list>
<value>l1</value>
<value>l2</value>
</list>
</property>
<property name="mySet">
<set>
<value>s1</value>
<value>s2</value>
</set>
</property>
<property name="myMap">
<map>
<entry key="k1" value="v1"/>
<entry key="k2" value="v2"/>
</map>
</property>
<property name="myP">
<props>
<prop key="msg">usa</prop>
</props>
</property>
</bean>
Spring @Required 注释 代表必须在spring.xml中对name字段初始化
@Required
public void setName(String name) {
this.name = name;
}
属性中的 @Autowired 当时使用 为自动连接属性传递的时候,Spring 会将这些传递过来的值或者引用自动分配给那些属性
@Autowired
private Apple apple;
<bean id="box" class="com.spring.demo1.Box">
</bean>
<bean id="apple" class="com.spring.demo1.Apple">
</bean>
Spring @Qualifier 注释
可能会有这样一种情况,当你创建多个具有相同类型的 bean 时,并且想要用一个属性只为它们其中的一个进行装配,在这种情况下,你可以使用 @Qualifier 注释和 @Autowired 注释通过指定哪一个真正的 bean 将会被装配来消除混乱
@Autowired
@Qualifier("apple2")
private Apple apple;
<context:annotation-config/>
<bean id="box" class="com.spring.demo1.Box">
</bean>
<bean id="apple1" class="com.spring.demo1.Apple" scope="prototype">
<property name="msg" value="apple1"/>
</bean>
<bean id="apple2" class="com.spring.demo1.Apple" scope="prototype">
<property name="msg" value="apple2"/>
</bean>
@Resource 注释:
你可以在字段中或者 setter 方法中使用 @Resource 注释,它和在 Java EE 5 中的运作是一样的。@Resource 注释使用一个 ‘name’ 属性,该属性以一个 bean 名称的形式被注入。
@Configuration 和 @Bean 注解
@Configuration表示一个类等同于spring.xml的作用,@Bean表示一个类可以不在xml中表明就已经是DI注入类了
@Configuration
public class Fruit {
@Bean
public Apple getApple() {
return new Apple();
}
@Bean
public Pear getPear() {
return new Pear();
}
}
public static void main(String[] args) {
ApplicationContext context =
new AnnotationConfigApplicationContext(Fruit.class);
Apple obj = (Apple) context.getBean(Apple.class);
System.out.println(obj);
Pear obj2 = (Pear) context.getBean(Pear.class);
System.out.println(obj2);
}
public static void main(String[] args) {
AnnotationConfigApplicationContext context =
new AnnotationConfigApplicationContext();
context.register(Fruit.class);
context.refresh();
Apple obj = (Apple) context.getBean(Apple.class);
System.out.println(obj);
Pear obj2 = (Pear) context.getBean(Pear.class);
System.out.println(obj2);
}
@import 注解允许从另一个配置类中加载 @Bean 定义。
@Configuration
public class ConfigA {
@Bean
public A a() {
return new A();
}
}
@Configuration
@Import(ConfigA.class)
public class ConfigB {
@Bean
public B b() {
return new B();
}
}
public static void main(String[] args) {
AnnotationConfigApplicationContext context =
new AnnotationConfigApplicationContext();
context.register(ConfigB.class);
context.refresh();
B obj2 = (B) context.getBean(B.class);
System.out.println(obj2);
A obj3 = (A) context.getBean(A.class);
System.out.println(obj3);
}
生命周期回调
@Bean 注解支持指定任意的初始化和销毁的回调方法,就像在 bean 元素中 Spring 的 XML 的初始化方法和销毁方法的属性:
@Bean(initMethod = "init",destroyMethod = "cleanup")
public B b() {
return new B();
}
public class B {
private String msg;
public void init() {
System.out.println("start");
}
public void cleanup() {
System.out.println("end");
}
}
监听上下文事件
为了监听上下文事件,一个 bean 应该实现只有一个方法 onApplicationEvent() 的 ApplicationListener 接口。
public class MyStart implements ApplicationListener<ContextStartedEvent>{
@Override
public void onApplicationEvent(ContextStartedEvent contextStartedEvent) {
System.out.println("start");
}
}
public class MyEnd implements ApplicationListener<ContextStoppedEvent>{
@Override
public void onApplicationEvent(ContextStoppedEvent contextStoppedEvent) {
System.out.println("end");
}
}
public static void main(String[] args) {
ConfigurableApplicationContext context =
new ClassPathXmlApplicationContext("spring.xml");
context.start();
HelloWorld obj = (HelloWorld) context.getBean("helloWorld");
System.out.println(obj);
context.stop();
}
<bean id="helloWorld" class="com.spring.demo1.HelloWorld">
<property name="message" value="Hello World!"/>
</bean>
<bean id="myStart" class="com.spring.demo1.MyStart"/>
<bean id="myEnd" class="com.spring.demo1.MyEnd"/>
Spring 事务管理
PlatformTransactionManager是一个事务管理器,管理器有2个方法,一个是commit代表提交事务,一个是rollback代表回滚事务
TransactionDefinition是一个事务实例
TransactionStatus是一个事务执行结果
public void update() {
TransactionDefinition transactionDefinition = new DefaultTransactionDefinition();
TransactionStatus status = transactionManager.getTransaction(transactionDefinition);
try {
//1
String SQL = "update Student set age=age+1 where id=1";
jdbcTemplateObject.execute(SQL);
//2
int i=1/0;
//3
String SQL2 = "update Marks set year=year-1 where sid=1";
jdbcTemplateObject.execute(SQL2);
//
transactionManager.commit(status);
System.out.println("commit");
} catch (Exception e) {
transactionManager.rollback(status);
System.out.println("rollback");
}
}
<bean id="dataSource"
class="org.springframework.jdbc.datasource.DriverManagerDataSource">
<property name="driverClassName" value="com.mysql.jdbc.Driver"/>
<property name="url" value="jdbc:mysql://localhost:3306/test"/>
<property name="username" value="root"/>
<property name="password" value="root"/>
</bean>
<bean id="transactionManager"
class="org.springframework.jdbc.datasource.DataSourceTransactionManager">
<property name="dataSource" ref="dataSource" />
</bean>
<bean id="studentJDBCTemplate"
class="com.spring.demo1.StudentJDBCTemplate">
<property name="dataSource" ref="dataSource" />
<property name="transactionManager" ref="transactionManager" />
</bean>
Spring 声明式事务管理
public void updateMoney() {
//1
String SQL = "update Student set age=age+1 where id=1";
jdbcTemplateObject.execute(SQL);
//2
int i = 1 / 0;
//3
String SQL2 = "update Marks set year=year-1 where sid=1";
jdbcTemplateObject.execute(SQL2);
System.out.println("commit");
}
<bean id="dataSource"
class="org.springframework.jdbc.datasource.DriverManagerDataSource">
<property name="driverClassName" value="com.mysql.jdbc.Driver"/>
<property name="url" value="jdbc:mysql://localhost:3306/test"/>
<property name="username" value="root"/>
<property name="password" value="root"/>
</bean>
<bean id="transactionManager"
class="org.springframework.jdbc.datasource.DataSourceTransactionManager">
<property name="dataSource" ref="dataSource" />
</bean>
<bean id="studentJDBCTemplate"
class="com.spring.demo1.StudentJDBCTemplate">
<property name="dataSource" ref="dataSource" />
</bean>
<aop:config>
<aop:pointcut id="updatePoint"
expression="execution(* com.spring.demo1.StudentJDBCTemplate.updateMoney(..))"/>
<aop:advisor advice-ref="txAdvice" pointcut-ref="updatePoint"/>
</aop:config>
<tx:advice id="txAdvice" transaction-manager="transactionManager">
<tx:attributes>
<tx:method name="updateMoney"/>
</tx:attributes>
</tx:advice>
基于注解的方式需要在业务层上添加一个@Transactional的注解。
<bean id="dataSource"
class="org.springframework.jdbc.datasource.DriverManagerDataSource">
<property name="driverClassName" value="com.mysql.jdbc.Driver"/>
<property name="url" value="jdbc:mysql://localhost:3306/test"/>
<property name="username" value="root"/>
<property name="password" value="root"/>
</bean>
<bean id="transactionManager"
class="org.springframework.jdbc.datasource.DataSourceTransactionManager">
<property name="dataSource" ref="dataSource"/>
</bean>
<bean id="studentJDBCTemplate"
class="com.spring.demo1.StudentJDBCTemplate">
<property name="dataSource" ref="dataSource"/>
</bean>
<tx:annotation-driven transaction-manager="transactionManager"/>
@Transactional(rollbackFor = Exception.class)
public void updateMoney() {
//1
String SQL = "update Student set age=age+1 where id=1";
jdbcTemplate.execute(SQL);
//2
int i = 1 / 0;
//3
String SQL2 = "update Marks set year=year-1 where sid=1";
jdbcTemplate.execute(SQL2);
//
System.out.println("commit");
}
Spring常用注解介绍【经典总结】 https://blog.csdn.net/u010648555/article/details/76299467
使用spring.xml中<bean>元素中的<constructor-arg>和<property>元素来注入相互协作的bean
自动装配
byName: 由属性名自动装配。Spring 容器看到在 XML 配置文件中 bean 的自动装配的属性设置为 byName。然后尝试匹配,并且将它的属性与在配置文件中被定义为相同名称的 beans 的属性进行连接。
byType: 由属性数据类型自动装配。Spring 容器看到在 XML 配置文件中 bean 的自动装配的属性设置为 byType。然后如果它的类型匹配配置文件中的一个确切的 bean 名称,它将尝试匹配和连接属性的类型。如果存在不止一个这样的 bean,则一个致命的异常将会被抛出。
Spring 自动装配 ‘byName’
在配置文件中,如果一个 bean 定义设置为自动装配 byName,并且它包含 spellChecker 属性(即,它有一个 setSpellChecker(...) 方法),那么 Spring 就会查找定义名为 spellChecker 的 bean,并且用它来设置这个属性。
<bean id="box"
class="com.spring.demo1.Box" autowire="byName">
</bean>
<bean id="apple"
class="com.spring.demo1.Apple">
<property name="msg" value="appleMsg"/>
</bean>
Spring 自动装配 ‘byType’
在配置文件中,如果一个 bean 定义设置为自动装配 byType,并且它包含 SpellChecker 类型的 spellChecker 属性,那么 Spring 就会查找定义名为 SpellChecker 的 bean,并且用它来设置这个属性。你仍然可以使用 <property> 标签连接其余属性。
<bean id="box"
class="com.spring.demo1.Box" autowire="byType">
</bean>
<bean id="apple"
class="com.spring.demo1.Apple">
<property name="msg" value="appleMsg"/>
</bean>

Spring常用注解介绍【经典总结】 https://blog.csdn.net/u010648555/article/details/76299467
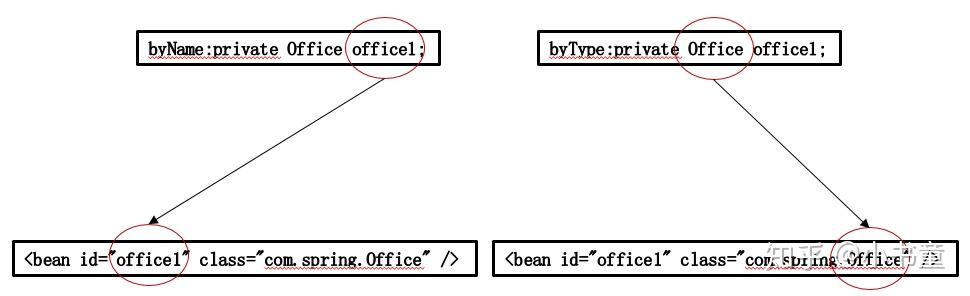
@Resource 的作用相当于 @Autowired,只不过 @Autowired 按 byType 自动注入,面@Resource 默认按 byName 自动注入罢了。@Resource 有两个属性是比较重要的,分别是 name 和 type,Spring 将@Resource 注释的 name 属性解析为 Bean 的名字,而 type 属性则解析为 Bean 的类型。所以如果使用 name 属性,则使用 byName 的自动注入策略,而使用 type 属性时则使用 byType 自动注入策略。如果既不指定 name 也不指定 type 属性,这时将通过反射机制使用 byName 自动注入策略。
@Resource(type=Car.class)
@Resource(name = "office1")
要让 JSR-250 的注释生效,除了在 Bean 类中标注这些注释外,还需要在 Spring 容器中注册一个负责处理这些注释的 BeanPostProcessor:
<bean class="org.springframework.context.annotation.CommonAnnotationBeanPostProcessor"/>
也就是说,在 XML 配置文件中定义 Bean,通过@Autowired 或 @Resource 为 Bean 的成员变量、方法入参或构造函数入参提供自动注入的功能。
能否也通过注释定义 Bean,从 XML 配置文件中完全移除 Bean 定义的配置呢?答案是肯定的,我们通过 Spring 2.5 提供的@Component 注释就可以达到这个目标了。
<context:component-scan base-package="com.baobaotao"/>
值得注意的是 <context:component-scan/> 配置项不但启用了对类包进行扫描以实施注释驱动 Bean 定义的功能,同时还启用了注释驱动自动注入的功能
Spring注解详解 https://blog.csdn.net/xyh820/article/details/7303330