适合小白的PT盒子入门指南

关于PT盒子/seedbox
盒子是什么?简单说就是拥有高带宽(特别是上传带宽的)的7x24小时运行的远程电脑。
本文主要给PT萌新一个刷流的思路及指南,很多内容是在各处搜刮 (会尽量列明出处,如果您不希望内容出现在这,可以私信我),参考大佬的思路,及自己折腾挺多个日夜捣鼓出来的。对萌新应该还是会有些帮助,如果是大佬,可以在评论区点评,也可以直接绕道,不胜感激。
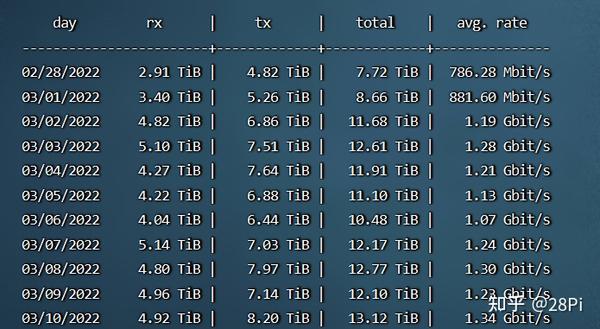
如果按照本文的设置,应该可以达到每天6-8T的上传量 (当然这需要看R了那些站的种子),每个月突破200T应该不成问题。这是楼主最近一段时间的日流量图,除了前两天刚到手在优化之外,其余基本都是6-8T之间的上传。

视频教程已更新,可移步
盒子购买
楼主用的HETZNER的拍卖机,对其他机器没有研究,各位可以直接照搬。
同款拍卖机 (涨价了, 以前23€, 现在30€ ,折合最新的汇率差不多210RMB)


这是购买链接 Server auction - Hetzner Online GmbH
购买流程: 注册账号→付款购买→购买之后会收到邮件需要验证身份,可以持护照加水印解决。购买需要外币卡(mastercard/visa), 也可绑定paypal使用。听说paypal支付20欧可以免护照验证可以试试。
如果你想要便宜的机器,可以尝试One Provider (OP)风靡一时的3o盒。然而现在也不便宜。


附上购买链接:https://oneprovider.com/dedicated-servers/paris-france
盒子系统一键安装及一键优化
稍后用到的工具及大佬脚本
- 一键安装Debian 10:仅适用软Raid, 多硬盘且硬盘大小相同的Hetzner独服
echo x | installimage -p /boot:ext3:1G,/:ext4:all -l 0 -r yes -i images/Debian-1010-buster-64-minimal.tar.gz -a -n Hz && reboot- 最新的Debian 11可用以下脚本
echo x | installimage -p /boot:ext3:1G,/:ext4:all -l 0 -r yes -i images/Debian-1106-bullseye-amd64-base.tar.gz -a -n Hz && reboot- Jerry大佬一键优化脚本 (安装QB, 安装Autoremove-torrents, BBR优化)
bash <(wget -qO- https://raw.githubusercontent.com/jerry048/Dedicated-Seedbox/main/Install.sh) user password 8 # user 用户名自己取,password 密码自己设,最后一位是QB缓存大小 (GB), 大佬推荐设为系统内存的1/4到1/8,我选的盒子是32G,设置了8GB- Finalshell SSH工具: http://www.hostbuf.com/ 用来连接你的盒子,可以浏览目录等
- Screen: 这是个命令行终端软件,作用是防止你跟服务器失联。碰到的时候你就懂了,不一定会用到。可查看参考里菜佬的使用介绍
手把手指南
一键安装Debian 10
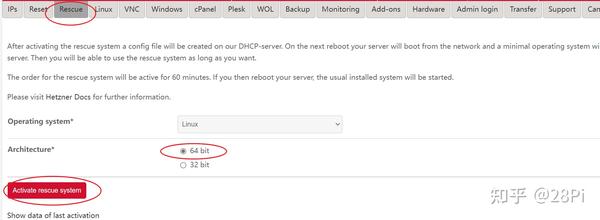
- 进入HZ管理界面,进入rescue救援模式,选择64位,选择激活救援系统

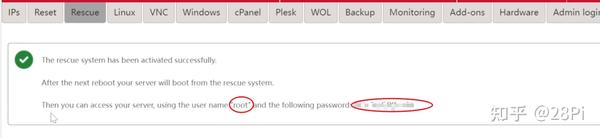
- 记下出现的账号跟密码,用来后面finalshell登录盒子

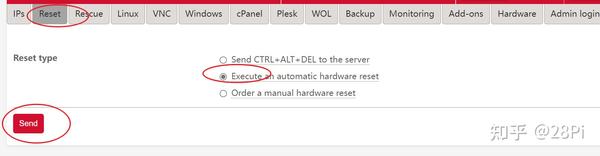
- 进入重置界面,进行一次硬件重置,重置后你的邮箱会收到邮件,等成功后可用第二步记下的账户密码登录你的盒子

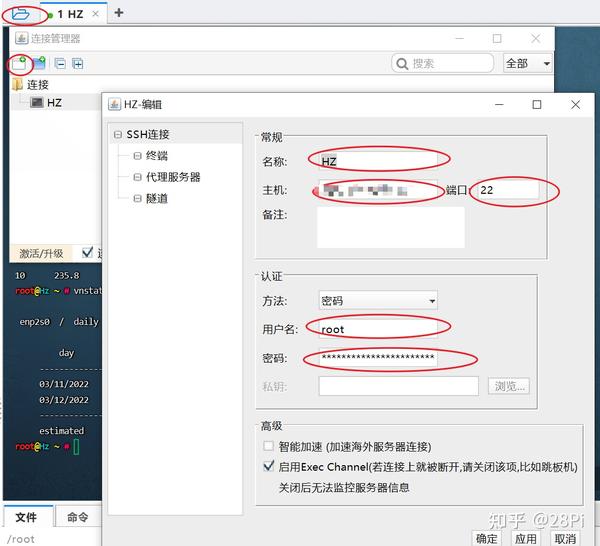
- 打开finalshell,选择左上角那个,出来连接管理器,接着选左上角那个,新建一个ssh连接(linux), 跳出来窗口。名称随意,主机是你hz盒子的ipv4地址,端口选22,用户名密码用第二步记录下的。


- 直接敲入一键代码,等待安装即可,安装完成后会自动断开,等待一会再次手动进行连接,连接时跳出警告,接受并保存即可


到这里我们已经成功安装完Debian 10系统
安装杰佬一键脚本
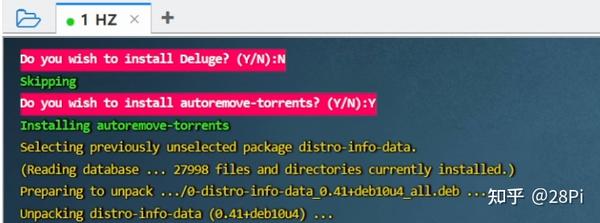
- 上面连接盒子之后,直接敲入杰佬一键脚本代码运行
- 是否安装QB,输入Y, 选择QB版本, 你可以选4.1.9 也可以选4.3.8 (4.3.8 QB里可以进行更多设置,看你后面想不想自己折腾)


- 是否安装Deluge,我只用QB,所以选了N; 是否安装autoremove-torrents,选Y

- 是否需要预留存储空间,想要设置的最小做种时间,一路回车即可


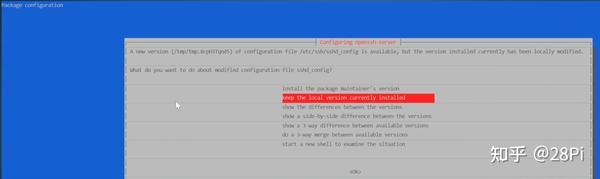
- SSH config的version,选N (default)即可;后来跳出来的keep本地的即可


- 是否安装BBR, 当然选Y
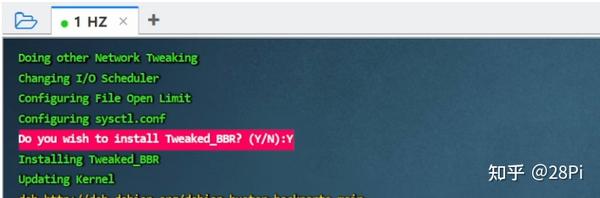

- BBR安装完成,需要重启一次生效,我们直接重启
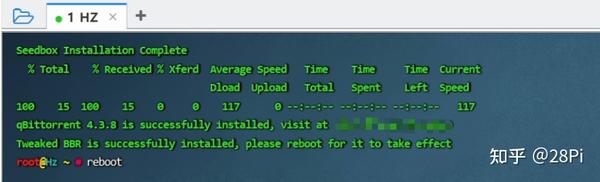
到这里就大功告成了
这里分享一个查看盒子配置的指令
wget -qO- bench.sh|bash #可以查看盒子内存,硬盘I/O, 网络测速Flexget配置
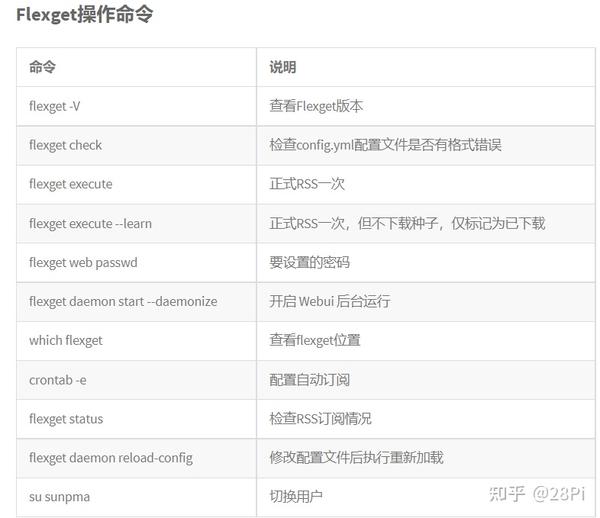
安装flexget
pip3 install flexget #安装flexget
which flexget #查询 FlexGet 安装位置,例如位置为 /usr/local/bin/flexget
flexget -V #查看flexget版本
配置Flexget目录及config文件
mkdir /root/.flexget #创建.flexget目录
nano /root/.flexget/config.yml # 创建及更改config.yml内容
mkdir ~/.flexget/plugins && cd ~/.flexget/plugins && wget https://github.com/Juszoe/flexget-nexusphp/releases/download/v1.4/nexusphp.py #创建plugins目录,下载nexusphp插件
flexget web passwd Peterpt@pt311%s #设置web ui 后台密码 为 Peterpt@pt311%s
flexget daemon start --daemonize #开启 webui 后台运行
实际情况如图


webui运行后,直接登录浏览器,3539为我设置的端口,前面为盒子的ipv4地址


Config文件样本
config.yml可以登录web ui后台去编辑也可以用notepad++打开.flexget文件夹下面的config.yml来编辑。这里给出个简单的样本
web_server:
bind: 0.0.0.0
port: 3539
web_ui: yes
schedules:
- tasks: [Test]
interval:
minutes: 5 #每5分钟R一次种子
templates:
qb:
qbittorrent:
path: /home/你设置的username/qbittorrent/Downloads/
host: 你盒子的Ipv4地址
port: 8080
username: 用户名
password: 密码
# 任务
tasks:
Test:
rss: 站点RSS链接
url:
other_fields: [link]
nexusphp:
cookie: '站点的cookie'
hr: no
content_size: #这里我筛选20G到300G的种子
min: 20000
max: 307200
strict: no
template: qb
qbittorrent:
label: Test # QB里设置category为Test
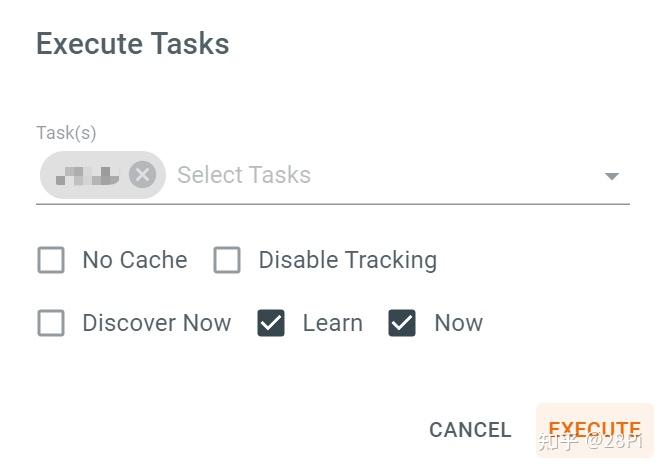
maxupspeed: 100000 #设置限速100MB/s 针对有上传限速的网站编辑完后在webui后台选择Tasks→Execute,这里先进行一次learn, 来筛选掉符合条件的旧种

flexget其他指令

ART 配置
创建config.yml及logs目录
cd /root
mkdir art
mkdir ~/art/logs
nano /root/art/config.yml
测试运行
autoremove-torrents -v -c /root/art/config.yml #测试运行一次art,并不会删种,可以查看是否有错误一些说明

编辑定时任务crontab -e
- 查看autoremove-torrents所在目录
which autoremove-torrents- 创建定时任务,输入 crontab -e,写入如下指令,然后ctrl+X退出保存即可
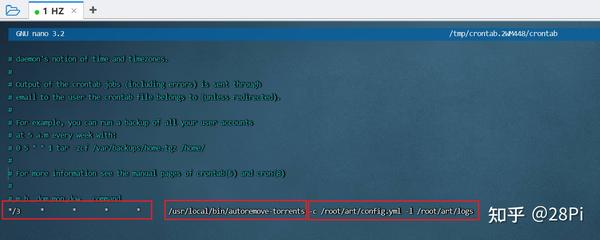

- 以下命令来重启cron服务
systemctl restart cron.service- crontab -l 指令可以查看已有的cron服务
查看是否运行
进入logs文件夹,logs文件按天会单独列出


删种策略
Autoremove torrents 官方文档:
配置 - autoremove-torrents 1.5.3 文档
黑车
删除下载速度远超上传的种子
| 下载 | 上传 |
|---|---|
| 80 | 65 |
| 60 | 45 |
| 40 | 25 |
| 20 | 15 |
clean_by_speed:
      status: Downloading
      excluded_categories:
        - MySaved
      remove: download_speed > 40000 and upload_speed < 25000
HR种子:ex. 如下载大于50%触发HR,可额外附加progress < 50
慢车
- 2小时内慢速上传
remove: create_time > 7200 and (average_uploadspeed < 500 or ratio < 1)删除完成的种子
- 低速种策略1
clean_Seeding_S1:
      status:
        - Uploading
      excluded_categories:
        - MySaved
remove: (leecher < 3 and upload_speed < 50) or (average_uploadspeed < 400)- 低速种策略2
clean_Seeding_S2:
      status:
        - Uploading
      excluded_categories:
        - MySaved
      remove: upload_speed < 2 or connected_leecher < 1
超时下载
- 24小时内未完成删除
24hr_free_countdown_strategy:
      excluded_categories:
        - MySaved
      remove: progress < 100 and create_time > 86400
HR 删种
- 做种超过140h后删除(可根据不同站点自己设置时间)
remove: seeding_time > 504000 and average_uploadspeed < 400限制最大下载数
limit_max_torrents:
      status:
        - downloading
      excluded_categories:
        - MySaved
      maximum_number:
        limit: 16
        action: remove-inactive-seeds
其他策略
- 限制最大上传量(针对某些非VIP 100%黑种站):upload_ratio: 3
- 根据做种人数/下载人数:
delete_by_peernumber:
      status:
        - Downloading
      excluded_categories:
        - MySaved
      remove: seeder > 3 or connected_leecher < 2
样本
delete_task:
  client: qbittorrent
  host: http://51.159.35.144:8080
  username: admin
  password: admin123456
  strategies:
    24hr_free_countdown_strategy:
      excluded_categories:
        - MySaved
      remove: progress < 100 and create_time > 86400 # not finished after 24 hours
    clean_by_upload_ratio_strategy:
      categories:
        - XXX
      upload_ratio: 3
    clean_slow_uploading_S1:
      status:
        - Downloading
      excluded_categories:
        - MySaved
      remove: create_time > 7200 and (average_uploadspeed < 300 or ratio < 1) # 2 hours
    clean_slow_uploading_S2:
      status:
        - Downloading
      excluded_categories:
        - MySaved
      remove: seeder > 3 or connected_leecher < 2
    clean_Seeding_S1:
      status:
        - Uploading
      excluded_categories:
        - MySaved
      remove: (leecher < 3 and upload_speed < 50) or (average_uploadspeed < 400)
    clean_Seeding_S2:
      status:
        - Uploading
      excluded_categories:
        - MySaved
      remove: upload_speed < 2 or connected_leecher < 1
    clean_by_speed_S1:
      status: Downloading
      excluded_categories:
        - MySaved
      remove: download_speed > 40000 and upload_speed < 25000
    clean_by_speed_S2:
      status: Downloading
      excluded_categories:
        - MySaved
      remove: download_speed > 20000 and upload_speed < 15000
    clean_by_speed_S3:
      status: Downloading
      excluded_categories:
        - MySaved
      remove: download_speed > 60000 and upload_speed < 45000
    clean_HR_XXX_strategy:
      categories:
        - XXX
      status:
        - Uploading
      remove: seeding_time > 504000 and average_uploadspeed < 400
    limit_max_torrents:
      status:
        - downloading
      excluded_categories:
        - MySaved
      maximum_number:
        limit: 16
        action: remove-inactive-seeds
  delete_data: true
查看流量统计 Vnstat
安装Vnstat
sudo apt-get install vnstat #安装脚本
systemctl status vnstat #查看是否运行
ls /var/lib/vnstat/ #查看监控网口

vnstat -i enp2s0 -l #view live traffic, enp2s0为上面命令得到的监控网口
vnstat -h #查看过去24小时的流量
vnstat -d #查看过去30天的流量
vnstat -m #查看每个月的流量
vnstat -t #查看top10天的流量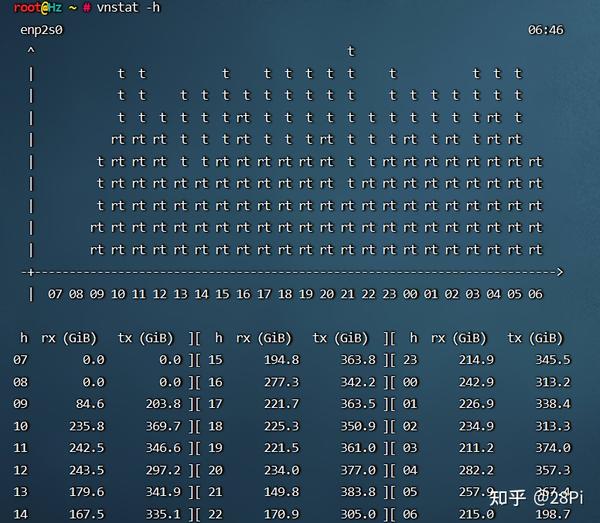

文章到这里就结束了,就像开头所说这只是提供一种刷流的思路。有兴趣的PT友也可以了解下Vertex,可以集中管理RSS跟删种,免除了Flexget跟Auto-remove torrents 至于R种,如果不想写config.yml也可以多开pt助手来实现同样的功能。
最后善意提醒各位PT友,请注意各站HR要求跟对seedbox的单独要求,以免被ban。
参考
- https://cn.wiki.ptbox.dev/hetzner-onekey/ Debian 10一键脚本
- https://blog.xiaocai.win/2020/02/07/screen.html screen的介绍及使用
- https://github.com/jerry048/Dedicated-Seedbox/blob/main/README-zh.md 杰佬的脚本
- FlexGet 官网configuration介绍
- https://sunpma.com/912.htmlsunpma.com/912.html Flexget命令原文链接