k8s 部署应用程序
k8s相关工具介绍:
Kubeadm
    Kubeadm解决了处理TLS加密配置、部署核心Kubernetes组件和确保其他节点可以轻松地加入集群的问题。生成的集群通过RBAC等机制得到保护。
    有关Kubeadm的更多详情,请参阅https://github.com/kubernetes/kubeadm

Minikube
    一个快速搭建单节点Kubenetes集群的工具,供希望尝试Kubernetes或与其一起开发的用户使用。
    有关Minikube的更多详情,请参阅:https://github.com/AliyunContainerService/minikube
minikube version  #检查是否已正确安装
minikube start #启动集群:
我英语不行,得多学。您可以略过。
Great! You now have a running Kubernetes cluster in your online terminal. Minikube started a virtual machine for you, and a Kubernetes cluster is now running in that VM.
太棒了!现在,您的在线终端中有一个正在运行的Kubernetes集群。Minikube为您启动了一个虚拟机,一个Kubernetes集群现在正在该VM中运行。
step2: 集群信息:
如果节点标记为NotReady,则它仍在启动组件。
$ kubectl cluster-info  #集群及其健康状态的详细信息
Kubernetes master is running at https://172.17.0.20:8443
KubeDNS is running at https://172.17.0.20:8443/api/v1/namespaces/kube-system/services/kube-dns:dns/proxy

To further debug and diagnose cluster problems, use 'kubectl cluster-info dump'.
$ kubectl get nodes #查看集群中的节点
NAME       STATUS   ROLES    AGE   VERSION
minikube   Ready    master   19m   v1.13.3
step3: 部署容器
kubectl run first-deployment --image=katacoda/docker-http-server --port=80 #部署容器
kubectl get pods  #查看部署状态
kubectl expose deployment first-deployment --port=80 --type=NodePort #容器可以通过不同的网络选项公开。最常用的是NodePort,它为容器提供动态端口。
#查找分配的端口并执行HTTP请求。
export PORT=$(kubectl get svc first-deployment -o go-template='{{range.spec.ports}}{{if .nodePort}}{{.nodePort}}{{"\n"}}{{end}}{{end}}')
echo "Accessing host01:$PORT"
curl host01:$PORT
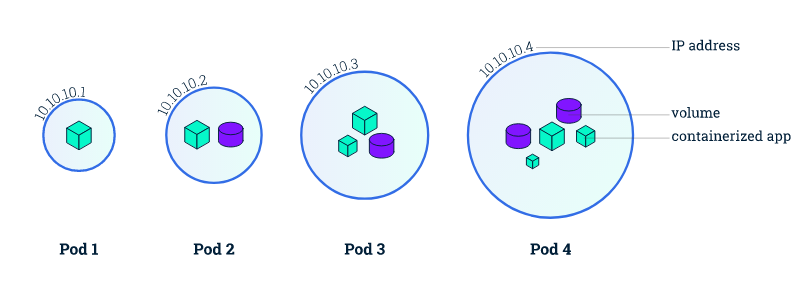
Kubernetes Pods
When you created a Deployment in Module 2, Kubernetes created a Pod to host your application instance. A Pod is a Kubernetes abstraction that represents a group of one or more application containers (such as Docker or rkt), and some shared resources for those containers. Those resources include:
- Shared storage, as Volumes
- Networking, as a unique cluster IP address
- Information about how to run each container, such as the container image version or specific ports to use
A Pod models an application-specific "logical host" and can contain different application containers which are relatively tightly coupled. For example, a Pod might include both the container with your Node.js app as well as a different container that feeds the data to be published by the Node.js webserver. The containers in a Pod share an IP Address and port space, are always co-located and co-scheduled, and run in a shared context on the same Node.
Pods are the atomic unit on the Kubernetes platform. When we create a Deployment on Kubernetes, that Deployment creates Pods with containers inside them (as opposed to creating containers directly). Each Pod is tied to the Node where it is scheduled, and remains there until termination (according to restart policy) or deletion. In case of a Node failure, identical Pods are scheduled on other available Nodes in the cluster.
PODS概述:
一个pod总是运行在一个节点。Node是Kubernetes中的工作机器,可以是虚拟机器,也可以是物理机器。每个节点由master管理。节点可以有多个pods,Kubernetes主节点会自动处理跨集群中节点的调度。master的自动调度考虑到每个节点上的可用资源。
每个Kubernetes Node至少运行:
- Kubelet,一个负责Kubernetes Master和Node之间通信的过程;它管理在机器上运行的Pods和容器。
- 容器运行时(如Docker,Rkt)负责从注册表中提取容器映像、解压缩容器并运行应用程序。
只有当容器紧密耦合并且需要共享资源(如磁盘)时,才应该将它们排在同一个Pod中。
节点概述

在命令之后使用-帮助获取有关可能的参数的其他信息。
kubectl get nodes --help
通过运行kubectl Version命令,检查kubectl是否配置为与集群对话
这里我们看到可用的节点。Kubernetes将根据Node可用资源选择在哪里部署我们的应用程序
- kubectl get - list resources 列出资源
- kubectl describe - show detailed information about a resource 显示有关资源的详细信息
- kubectl logs - print the logs from a container in a pod 对吊舱中的容器执行命令
- kubectl exec 对吊舱中的容器执行命令
部署应用程序
这将对指定的资源(如节点、容器)执行指定的操作(如创建、描述)。您可以在命令之后使用--help获取有关可能的参数的其他信息(kubectl get node --help)。通过运行kubectl Version命令,检查kubectl是否配置为与集群对话:
$ kubectl version
Client Version: version.Info{Major:"1", Minor:"13", GitVersion:"v1.13.3", GitCommit:"721bfa751924da8d1680787490c54b9179b1fed0", GitTreeState:"clean", BuildDate:"2019-02-01T20:08:12Z", GoVersion:"go1.11.5", Compiler:"gc", Platform:"linux/amd64"}
Server Version: version.Info{Major:"1", Minor:"13", GitVersion:"v1.13.3", GitCommit:"721bfa751924da8d1680787490c54b9179b1fed0", GitTreeState:"clean", BuildDate:"2019-02-01T20:00:57Z", GoVersion:"go1.11.5", Compiler:"gc", Platform:"linux/amd64"}
$ kubectl get nodes
NAME       STATUS   ROLES    AGE     VERSION
minikube   Ready    master   2m13s   v1.13.3
$ kubectl get nodes  #要查看集群中的节点
NAME       STATUS   ROLES    AGE   VERSION
minikube   Ready    master   12m   v1.13.3
我们需要提供deployments名称和应用程序镜像位置(包括DockerHub外部托管的image的完整存储库url)。port: 在特定端口上运行应用程序,:
$ kubectl run kubernetes-bootcamp --image=gcr.io/google-samples/kubernetes-bootcamp:v1 --port=8080 #通过run创建一个deployments来部署应用程序
kubectl run --generator=deployment/apps.v1 is DEPRECATED and will be removed in a future version. Use kubectl run --generator=run-pod/v1 or kubectl create instead.
deployment.apps/kubernetes-bootcamp created
$ kubectl get deployments #列出部署
NAME                  READY   UP-TO-DATE   AVAILABLE   AGE
kubernetes-bootcamp   1/1     1            1           4s
刚刚。这为您执行了几项任务:
1、搜索一个可以运行应用程序实例的合适节点(我们只有一个可用节点)
2、将应用程序安排在该节点上运行。
3、配置群集,以便在需要时重新安排新节点上的实例。
查看我们运行在Kubernetes内部的应用程序
Pods是在一个私有的、孤立的网络上运行的。默认情况下,它们可以从同一Kubernetes集群中的其他豆荚和服务中看到,但不在该网络之外。当我们使用kubectl时,我们通过API端点与应用程序进行交互。。以后再讨论如何公开应用程序的其他选项。kubectl命令可以创建一个代理,将通信转发到集群范围内的专用网络中。代理可以通过按Control-C来终止,并且在运行时不会显示任何输出。我们将打开第二个终端窗口来运行代理。
kubectl proxy
我们现在有了主机(在线终端)和Kubernetes集群之间的连接。代理允许从这些终端直接访问API。您可以看到通过代理端点承载的所有api,现在可以通过http://localhost:8001.获得这些api。例如,我们可以使用curl命令直接通过API查询版本:
$ curl http://localhost:8001/version
{
  "major": "1",
  "minor": "13",
  "gitVersion": "v1.13.3",
  "gitCommit": "721bfa751924da8d1680787490c54b9179b1fed0",
  "gitTreeState": "clean",
  "buildDate": "2019-02-01T20:00:57Z",
  "goVersion": "go1.11.5",
  "compiler": "gc",
  "platform": "linux/amd64"
}
API服务器将根据POD名称自动为每个POD创建一个端点,这个端点也可以通过代理访问。首先,我们需要获得POD名称,然后将变量POD_NAME存储在环境中:
$ export POD_NAME=$(kubectl get pods -o go-template --template '{{range .items}}{{.metadata.name}}{{"\n"}}{{end}}')
$ echo Name of the Pod: $POD_NAME
Name of the Pod: kubernetes-bootcamp-6bf84cb898-9nxtv
现在,我们可以向运行在该pod中的应用程序发出HTTP请求:
$ curl http://localhost:8001/api/v1/namespaces/default/pods/$POD_NAME/proxy/
Hello Kubernetes bootcamp! | Running on: kubernetes-bootcamp-6bf84cb898-2k8q5 | v=1
URL是到pod的api的路由。
步骤1检查应用程序配置
kubectl get pods
$ kubectl get pods
NAME                                   READY   STATUS    RESTARTS   AGE
kubernetes-bootcamp-6bf84cb898-4bw7p   1/1     Running   0          3m27s
您可以使用这些命令查看应用程序何时部署、它们当前的状态是什么、它们正在运行的位置以及它们的配置。现在我们已经了解了更多关于集群组件和命令行的信息,让我们来探索一下我们的应用程序。
kubectl describe pods
我们在这里看到关于POD容器的详细信息:IP地址、所使用的端口以及与POD生命周期相关的事件列表。Description命令的输出非常广泛,涵盖了一些我们还没有解释过的概念,但是不要担心,在这个入门营结束时,它们将变得熟悉起来。
$ kubectl describe pods
Name:               kubernetes-bootcamp-6bf84cb898-4bw7p
Namespace:          default
Priority:           0
PriorityClassName:  <none>
Node:               minikube/172.17.0.55
Start Time:         Sat, 06 Apr 2019 13:02:52 +0000
Labels:             pod-template-hash=6bf84cb898
                    run=kubernetes-bootcamp
Annotations:        <none>
Status:             Running
IP:                 172.18.0.4
Controlled By:      ReplicaSet/kubernetes-bootcamp-6bf84cb898
Containers:
  kubernetes-bootcamp:
    Container ID:   docker://14c67655ffbc5375f478ac54c1089b581306a3a680623464fd675545a8f58d44
    Image:          gcr.io/google-samples/kubernetes-bootcamp:v1
    Image ID:       docker-pullable://jocatalin/kubernetes-bootcamp@sha256:0d6b8ee63bb57c5f5b6156f446b3bc3b3c143d233037f3a2f00e279c8fcc64af
    Port:           8080/TCP
    Host Port:      0/TCP
    State:          Running
      Started:      Sat, 06 Apr 2019 13:02:54 +0000
    Ready:          True
    Restart Count:  0
    Environment:    <none>
    Mounts:
      /var/run/secrets/kubernetes.io/serviceaccount from default-token-stx7p (ro)
Conditions:
  Type              Status
  Initialized       True
  Ready             True
  ContainersReady   True
  PodScheduled      True
Volumes:
  default-token-stx7p:
    Type:        Secret (a volume populated by a Secret)
    SecretName:  default-token-stx7p
    Optional:    false
QoS Class:       BestEffort
Node-Selectors:  <none>
Tolerations:     node.kubernetes.io/not-ready:NoExecute for 300s
                 node.kubernetes.io/unreachable:NoExecute for 300s
Events:
  Type    Reason     Age    From               Message
  ----    ------     ----   ----               -------
  Normal  Scheduled  3m14s  default-scheduler  Successfully assigned default/kubernetes-bootcamp-6bf84cb898-4bw7p to minikube
  Normal  Pulled     3m13s  kubelet, minikube  Container image "gcr.io/google-samples/kubernetes-bootcamp:v1" already present on machine
  Normal  Created    3m13s  kubelet, minikube  Created container
  Normal  Started    3m12s  kubelet, minikube  Started container
步骤2在终端中显示应用程序
回想一下,pods是在一个独立的私有网络中运行的,所以我们需要代理访问它们,以便调试和与它们交互。为此,我们将使用kubectl proxy命令在第二个终端窗口中运行代理。单击下面的命令自动打开新终端并运行代理:
$ kubectl proxy
Starting to serve on 127.0.0.1:8001
现在,我们再次获得pod名称,并直接通过代理查询该pod。要获取pod名称并将其存储在pod_name环境变量中,请执行以下操作:
$ export POD_NAME=$(kubectl get pods -o go-template --template '{{range .items}}{{.metadata.name}}{{"\n"}}{{end}}')
$ echo Name of the Pod: $POD_NAME
Name of the Pod: kubernetes-bootcamp-6bf84cb898-4bw7p
要查看应用程序的输出,请运行cURL请求
$ curl http://localhost:8001/api/v1/namespaces/default/pods/$POD_NAME/proxy/
Hello Kubernetes bootcamp! | Running on: kubernetes-bootcamp-6bf84cb898-2k8q5 | v=1
url是到Pod的API的路径。
步骤3查看容器日志:
应用程序通常发送给STDOUT的任何内容都会成为Pod中容器的日志。我们可以使用kubectl log命令检索这些日志:
$ kubectl logs $POD_NAME
Note: We don’t need to specify the container name, because we only have one container inside the pod.
步骤4在容器上执行命令
一旦Pod启动并运行,我们就可以直接在容器上执行命令。为此,我们使用exec命令并使用Pod的名称作为参数。让我们列出环境变量:
下面的命令必须开启代理后,在新终端运行才可以。
$ kubectl exec $POD_NAME env
PATH=/usr/local/sbin:/usr/local/bin:/usr/sbin:/usr/bin:/sbin:/bin
HOSTNAME=kubernetes-bootcamp-6bf84cb898-4bw7p
KUBERNETES_PORT_443_TCP=tcp://10.96.0.1:443
KUBERNETES_PORT_443_TCP_PROTO=tcp
KUBERNETES_PORT_443_TCP_PORT=443
KUBERNETES_PORT_443_TCP_ADDR=10.96.0.1
KUBERNETES_SERVICE_HOST=10.96.0.1
KUBERNETES_SERVICE_PORT=443
KUBERNETES_SERVICE_PORT_HTTPS=443
KUBERNETES_PORT=tcp://10.96.0.1:443
NPM_CONFIG_LOGLEVEL=info
NODE_VERSION=6.3.1
HOME=/root
接下来,让我们在Pod的容器中启动bash会话:
$ kubectl exec -ti $POD_NAME bash
root@kubernetes-bootcamp-6bf84cb898-4bw7p:/#
我们现在容器上有一个打开的控制台来运行NodeJS应用程序。应用程序的源代码位于server.js文件中:
root@kubernetes-bootcamp-6bf84cb898-4bw7p:/# cat server.js
var http = require('http');
var requests=0;
var podname= process.env.HOSTNAME;
var startTime;
var host;
var handleRequest = function(request, response) {
  response.setHeader('Content-Type', 'text/plain');
  response.writeHead(200);
  response.write("Hello Kubernetes bootcamp! | Running on: ");
  response.write(host);
  response.end(" | v=1\n");
  console.log("Running On:" ,host, "| Total Requests:", ++requests,"| App Uptime:", (new Date() - startTime)/1000 , "seconds", "| Log Time:",new Date());
}
var www = http.createServer(handleRequest);
www.listen(8080,function () {
    startTime = new Date();;
    host = process.env.HOSTNAME;
    console.log ("Kubernetes Bootcamp App Started At:",startTime, "| Running On: " ,host, "\n" );
});
您可以通过运行curl命令来检查应用程序是否已启动:
curl localhost:8080
注意:这里我们使用localhost,因为我们在NodeJS容器中执行了命令
若要关闭容器连接,请键入“exit”

