


参考链接:
[原创]记一次frida实战——对某视频APP的脱壳、hook破解、模拟抓包、协议分析一条龙服务-Android安全-看雪论坛-安全社区|安全招聘|bbs.pediy.com
FRIDA 安卓快速脱壳_问题很多的小明-CSDN博客_frida 脱壳
win10安装frida的坑和总结 - Maple_feng - 博客园
Frida 安装使用 配合burp抓包教程 - 学习笔记 – 云龙的蜗居
widows下曲折的frida安装过程Running setup.py install for frida ... – - 简书
---------
Frida-dexdump: GitHub - hluwa/frida-dexdump
Frida官网:Frida
Frida源码:Frida · GitHub
Frida-Unpack脱壳脚本: https://github.com/dstmath/frida-unpack
Frida-dexdump: https://github.com/hluwa/FRIDA-DEXDump
frida现在支持python3.8,请去官网看支持的版本,可能会更新
官网下载Frida地址:frida · PyPI
windows下载指定xx.y.z版本的Frida地址:https://pypi.org/project/frida/xx.y.z/#files
Frida的安装很简单,需要在windows安装frida客户端和在安卓安装frida服务端。
1、Windows上安装frida客户端
pip install frida
pip install frida-tools
如果安装失败
①安装frida
情况一:你下载的是frida-xx.yy.zz-py3.8-win-amd64.egg格式的文件
1、 frida · PyPI下载文件:frida-12.11.17-py3.8-win-amd64.egg(查看你自己对应的版本)
假设要12.9.8的版本安装在windows 下载地址 https://pypi.org/project/frida/12.9.8/#files或者
pip3 install frida==12.9.8 -i https://pypi.tuna.tsinghua.edu.cn/simple/
2、 2.1 将下载文件保存到C:\User\Adminstrator
2.2 还有说放到python/lib/site-packages下的
2.3 C:\Users\XXXX\AppData\Local\Programs\Python\Python38\Lib\site-packages 这个目录下在site-packages 这个目录下执行CMD 命令:easy_install frida-12.9.4-py3.8-win-amd64.egg3、重新执行pip安装
pip3 install frida -i https://pypi.mirrors.ustc.edu.cn/simple
pip3 install frida-tools -i https://pypi.mirrors.ustc.edu.cn/simple
4、重新pip不行的话用easy-install安装(我没有试这种方法)
下载完成之后,使用
easy_install安装python3 /usr/lib/python3/dist-packages/easy_install.py frida-12.8.16-py3.6-linux-x86_64.egg当运行到下图界面,直接 Ctrl+C 中断,因为国内访问国外的 Frida 网速很慢
root@kali:~/Documents# python3 /usr/lib/python3/dist-packages/easy_install.py frida-12.8.16-py3.6-linux-x86_64.egg
Processing frida-12.8.16-py3.6-linux-x86_64.egg
Copying frida-12.8.16-py3.6-linux-x86_64.egg to /usr/local/lib/python3.7/dist-packages
Adding frida 12.8.16 to easy-install.pth fileInstalled /usr/local/lib/python3.7/dist-packages/frida-12.8.16-py3.6-linux-x86_64.egg
Processing dependencies for frida==12.8.16
Searching for frida==12.8.16
Reading https://pypi.org/simple/frida/
^Cinterrupted
此时,再次运行pip3 install frida -i https://pypi.mirrors.ustc.edu.cn/simple/
情况二:你下载的是frida-xx.y.z.tar.gz文件解压该文件,会看见setup.py文件,在当前目录的cmd输入指令:python setup.py install
Microsoft Windows [版本 10.0.19041.1415]
(c) Microsoft Corporation。保留所有权利。

C:\Users\Admin\Desktop\dfafdaf\frida-12.9.8>python setup.py install
running install
running bdist_egg
running egg_info
writing frida.egg-info\PKG-INFO
writing dependency_links to frida.egg-info\dependency_links.txt
writing top-level names to frida.egg-info\top_level.txt
reading manifest file 'frida.egg-info\SOURCES.txt'
writing manifest file 'frida.egg-info\SOURCES.txt'
installing library code to build\bdist.win-amd64\egg
running install_lib
running build_py
creating build
creating build\lib.win-amd64-3.8
creating build\lib.win-amd64-3.8\frida
copying frida\core.py -> build\lib.win-amd64-3.8\frida
copying frida\__init__.py -> build\lib.win-amd64-3.8\frida
running build_ext
looking for prebuilt extension in home directory, i.e. C:\Users\Admin/frida-12.9.8-py3.8-win-amd64.egg
prebuilt extension not found in home directory, will try downloading it
querying pypi for available prebuilds
downloading prebuilt extension from https://files.pythonhosted.org/packages/79/c0/4a374ea482c386fc5ccc7680b062e9b7565a6c417c540dfdcb59320286b8/frida-12.9.8-py3.8-win-amd64.egg
extracting prebuilt extension
creating build\bdist.win-amd64
creating build\bdist.win-amd64\egg
creating build\bdist.win-amd64\egg\frida
copying build\lib.win-amd64-3.8\frida\core.py -> build\bdist.win-amd64\egg\frida
copying build\lib.win-amd64-3.8\frida\__init__.py -> build\bdist.win-amd64\egg\frida
copying build\lib.win-amd64-3.8\_frida.cp38-win_amd64.pyd -> build\bdist.win-amd64\egg
byte-compiling build\bdist.win-amd64\egg\frida\core.py to core.cpython-38.pyc
byte-compiling build\bdist.win-amd64\egg\frida\__init__.py to __init__.cpython-38.pyc
creating stub loader for _frida.cp38-win_amd64.pyd
byte-compiling build\bdist.win-amd64\egg\_frida.py to _frida.cpython-38.pyc
creating build\bdist.win-amd64\egg\EGG-INFO
copying frida.egg-info\PKG-INFO -> build\bdist.win-amd64\egg\EGG-INFO
copying frida.egg-info\SOURCES.txt -> build\bdist.win-amd64\egg\EGG-INFO
copying frida.egg-info\dependency_links.txt -> build\bdist.win-amd64\egg\EGG-INFO
copying frida.egg-info\top_level.txt -> build\bdist.win-amd64\egg\EGG-INFO
copying frida.egg-info\zip-safe -> build\bdist.win-amd64\egg\EGG-INFO
writing build\bdist.win-amd64\egg\EGG-INFO\native_libs.txt
creating dist
creating 'dist\frida-12.9.8-py3.8-win-amd64.egg' and adding 'build\bdist.win-amd64\egg' to it
removing 'build\bdist.win-amd64\egg' (and everything under it)
Processing frida-12.9.8-py3.8-win-amd64.egg
Removing d:\lds\environment\python\lib\site-packages\frida-12.9.8-py3.8-win-amd64.egg
Copying frida-12.9.8-py3.8-win-amd64.egg to d:\lds\environment\python\lib\site-packages
Adding frida 12.9.8 to easy-install.pth file

Installed d:\lds\environment\python\lib\site-packages\frida-12.9.8-py3.8-win-amd64.egg
Processing dependencies for frida==12.9.8
Finished processing dependencies for frida==12.9.8

C:\Users\Admin\Desktop\dfafdaf\frida-12.9.8>
情况三:你缺失其他依赖包 ----我是这种情况
C:\Users\Admin>pip3 install wheel
WARNING: Ignoring invalid distribution -ip (d:\lds\environment\python\lib\site-packages)
WARNING: Ignoring invalid distribution -ip (d:\lds\environment\python\lib\site-packages)
Looking in indexes: https://pypi.tuna.tsinghua.edu.cn/simple
Collecting wheel
  Downloading https://pypi.tuna.tsinghua.edu.cn/packages/27/d6/003e593296a85fd6ed616ed962795b2f87709c3eee2bca4f6d0fe55c6d00/wheel-0.37.1-py2.py3-none-any.whl (35 kB)
WARNING: Ignoring invalid distribution -ip (d:\lds\environment\python\lib\site-packages)
Installing collected packages: wheel
WARNING: Ignoring invalid distribution -ip (d:\lds\environment\python\lib\site-packages)
Successfully installed wheel-0.37.1
WARNING: Ignoring invalid distribution -ip (d:\lds\environment\python\lib\site-packages)
WARNING: Ignoring invalid distribution -ip (d:\lds\environment\python\lib\site-packages)
然后再去正常的步骤去安装
②安装frida-tools
python安装frida-tools - JebediahKerman - 博客园
首先去https://pypi.org/project/frida/#files选择合适的文件,例如frida-15.1.14-py3.8-win-amd64.egg,将链接中的files.pythonhosted.org替换为mirrors.tuna.tsinghua.edu.cn/pypi/web,然后将文件下载并保存到当前用户的home目录。
运行命令pip install frida-tools<--------***这句话不行,别用pip
python -m pip install frida==12.8.9       //不要直接用pip安装
python -m pip install frida-tools==5.3.0  //不要直接用pip安装
最后我是用python -m pip install frida-tools==5.3.0安装上的frida-toos


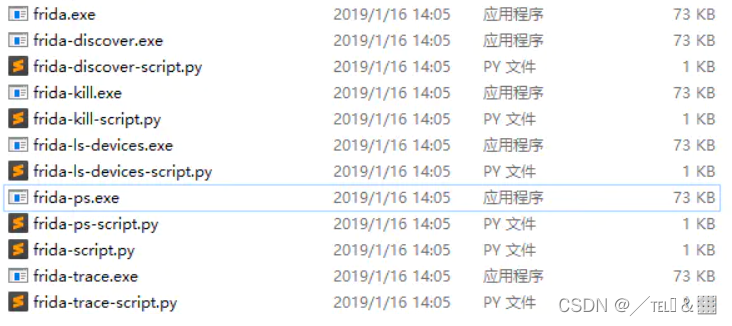
Frida提供了四个工具,frida-trace,frida-ps,frida,frida-discover,这些工具都位于python的Scripts路径下
2.Android上安装frida服务端(root更好)
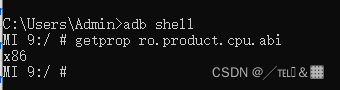
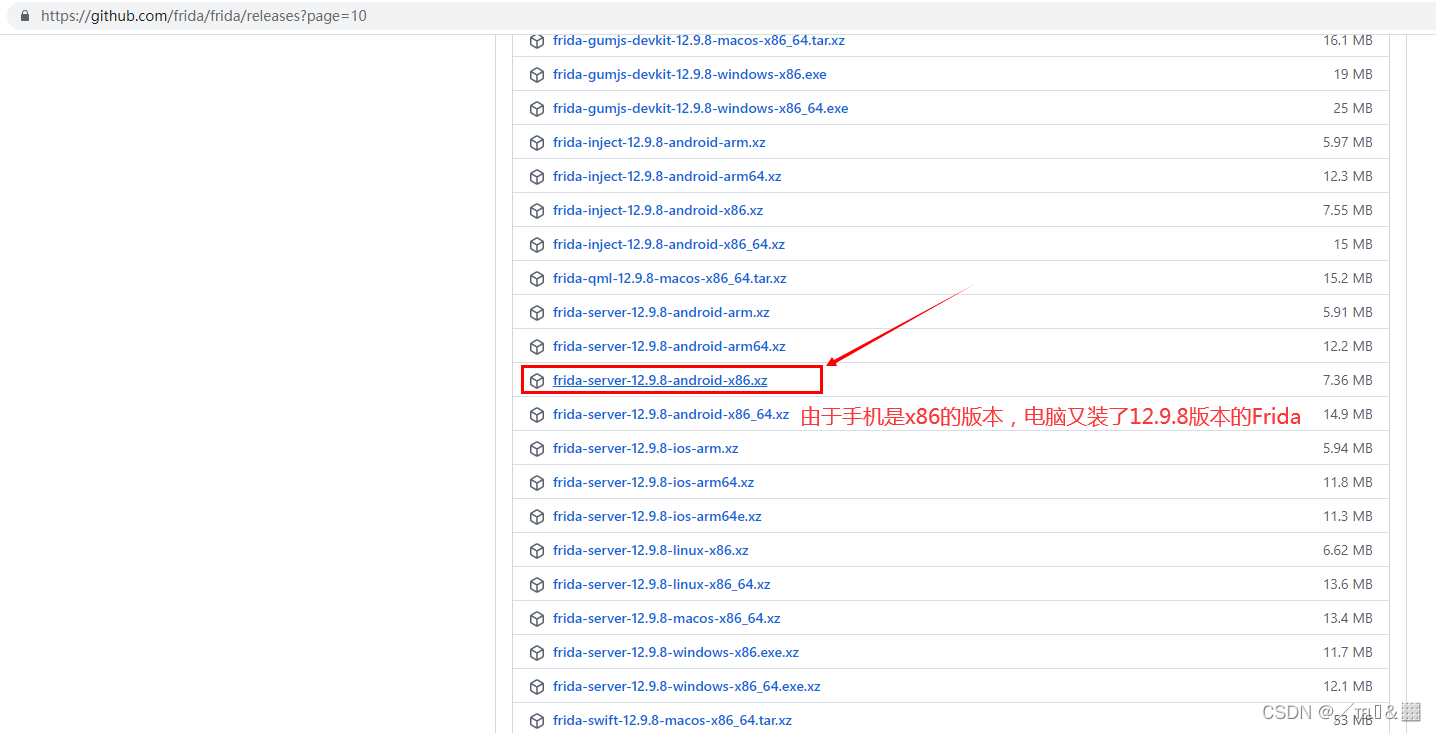
安装时与电脑客户端的版本相对应 我这里是 frida-server-12.9.8-android-x86
查看Android手机设备设置: adb shell ----> getprop ro.product.cpu.abi
或者一行命令
adb shell getprop ro.product.cpu.abi去git下载frida-server,注意手机ios/android 版本和电脑上装的frida版本一致:
https://github.com/frida/frida/releases
下载下来不要忘了解压:

在开发Android应用时,有时会要连接本地服务器,我们可能会首先想到用loaclhost或127.0.0.1等。这是不对了。因为模拟器是一个相对独立的系统,在模拟器中运行的程序用loacalhost或127.0.0.1将会连接模拟器本身。而不是你的本地计算机。


如果想要在模拟器中连接本地计算机可使用10.0.2.2这个IP。

即:模拟器中访问10.0.2.2 相当于访问本机localhost
————————————————
版权声明:本文为CSDN博主「lynchyo」的原创文章,遵循CC 4.0 BY-SA版权协议,转载请附上原文出处链接及本声明。
原文链接:https://blog.csdn.net/lynchyo/article/details/38443661
3.启动frida-server
①下载frida-server-12.9.8-android-x86
https://github.com/frida/frida/releases
下载对应pc客户端版本,后需要解压
前面已经做过了往下看
②上传 frida-server-12.7.5-android-x86 可执行程序
上传 PC 中的 frida-server-12.7.5-android-x86 可执行文件到 Android 模拟器中的 /data/system/frida/frida-server-12.7.5-android-x86 路径 ;
进入frida-server-12.9.8-android-x86 目录 , 执行
adb -s emulator-5554 push C:\Users\gqv20\Desktop\frida-server-12.9.8-android-x86 /data/local/tmp
或者
adb push C:\Users\gqv20\Desktop\frida-server-12.9.8-android-x86 /data/local/tmp

如果你在目标文件的目录下启的cmd则可以这样输入命令:
adb push frida-server-12.9.8-android-x86 /data/system/frida/frida-server-12.9.8-android-x86
③为 frida-server-12.7.5-android-x86 可执行程序赋予 777 权限
进入 adb shell 命令行 ,先输入su回车一下更好, 然后再进入 /data/system/frida/ 目录 , 修改 frida-server-12.9.8-android-x86 可执行程序的权限 ,执行
chmod 777 ./*④执行 frida-server-12.7.5-android-x86 可执行程序
在 /data/system/frida/ 目录中执行
./frida-server-12.7.5-android-x86 命令 , 即可启动 Frida 远程服务区端 ;
完整输出命令 :
root@aosp:/data/system/frida #./frida-server-12.7.5-android-x86                                              <
WARNING: linker: ./frida-server-12.7.5-android-x86: unused DT entry: type 0x6ffffef5 arg 0x1c24
1.查看有几个服务
C:\Users\gqv20>adb devices
List of devices attached
ZX1G222CLR device
2.给root权限
C:\Users\gqv20>adb shell
shell@shamu:/ $ su
su
3.进入到tmp目录下
root@shamu:/ # cd /data/local/tmp/
cd /data/local/tmp/
4.给执行权限
root@shamu:/data/local/tmp # chmod 777 /data/local/tmp/frida-server-12.9.8-android-x86
chmod 777 /data/local/tmp/frida-server-12.9.8-android-x86
5.查看ls
root@shamu:/data/local/tmp # ls
ls
busybox
frida-server-12.9.8-android-arm
frida-server-12.9.8-android-arm
frida-server-12.9.8-android-x86
krperm.txt
minicap
minicap.so
re.frida.server
6.正式启动frida-server
root@shamu:/data/local/tmp # ./frida-server-12.9.8-android-x86
./frida-server-12.9.8-android-arm查看手机上的apk进程
方式一:
另一起个cmd 输入 frida-ps -U 查看手机进程,如果有,则代表Frida已经连接成功,后续我们也可以使用Frida进行hook了
frida-ps -U方式二:
使用frida-ps -R也可以,但是需要进行转发
adb forward tcp:27042 tcp:27042

frida-ps -R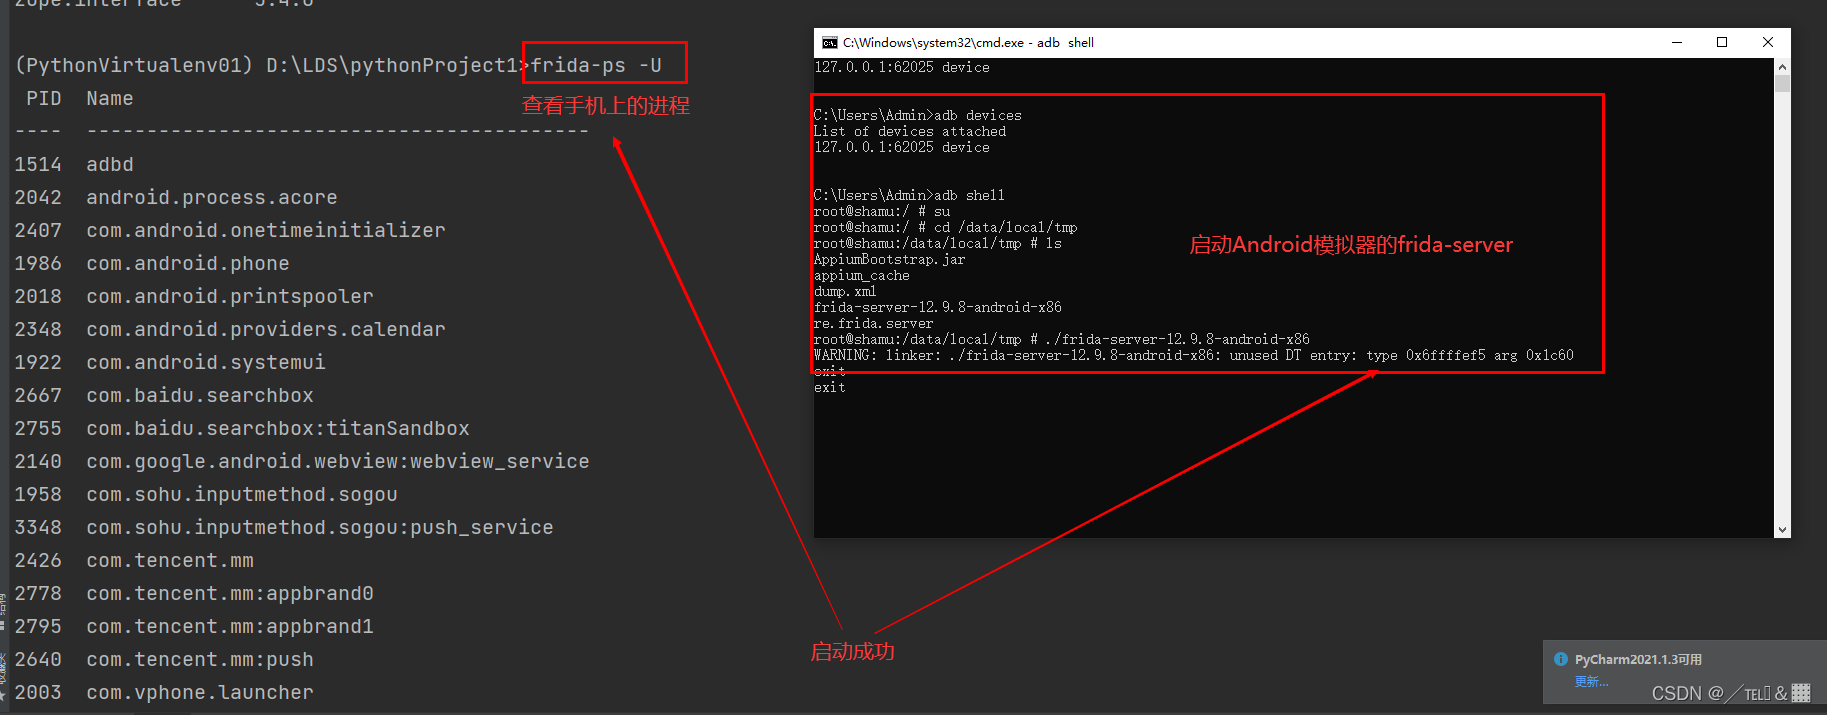
如果出现失败就是frida-server版本出问题了,还有需要root权限,建议使用夜神模拟器

如果不解压下载好的那个文件直接push到模拟器或者手机就会遇到下面俩帖子
[求助]模拟器安装frida-server无法启用是怎么回事呢?-软件逆向-看雪论坛-安全社区|安全招聘|bbs.pediy.com
https://github.com/frida/frida/issues/538
如果出现失败就是frida-server版本出问题了,还有需要root权限,建议使用夜神模拟器
测试代码
import frida
import pprint

def on_message(message,data):
    print("[on_message] message:",message,"data:",data)


rdev =frida.get_usb_device()
process = rdev .enumerate_processes()#获取手机所有进程
pprint.pprint(process)
session=rdev.attach("com.dianping.v1") #frida-ps -U 查看到的app名字
print(session)

script=session.create_script("""
rpc.exports.enumerateModules=function(){
return Process.enumerateModules();
};
""")

script.on("message",on_message)
script.load()
# 获取进程使用的所有模块
pprint.pprint([m["name"] for m in script.exports.enumerate_modules()])
--------------------------------------------------------------------------------------------------------------------------------
4、dexdump 脱
Android 反编译_duke_knight的博客-CSDN博客
1. dex2jar 下载地址 https://sourceforge.net/projects/dex2jar/files/
2. jd-gui 下载地址 http://jd.benow.ca/
3. APKTool下载地址 http://ibotpeaches.github.io/Apktool/install/
4. 字节码查看器: Bytecode Viewer - Java & Android APK Reverse Engineering Suite/Tool
6. apktool : Apktool - A tool for reverse engineering 3rd party, closed, binary Android apps.
7. OWASP Uncrackable Level2 APK
8. AndroidSdk和模拟器: https://developer.android.com/studio/index.html
9.frida-dexdump官网:https://github.com/hluwa/FRIDA-DEXDump
这个框中的是我自己的步骤
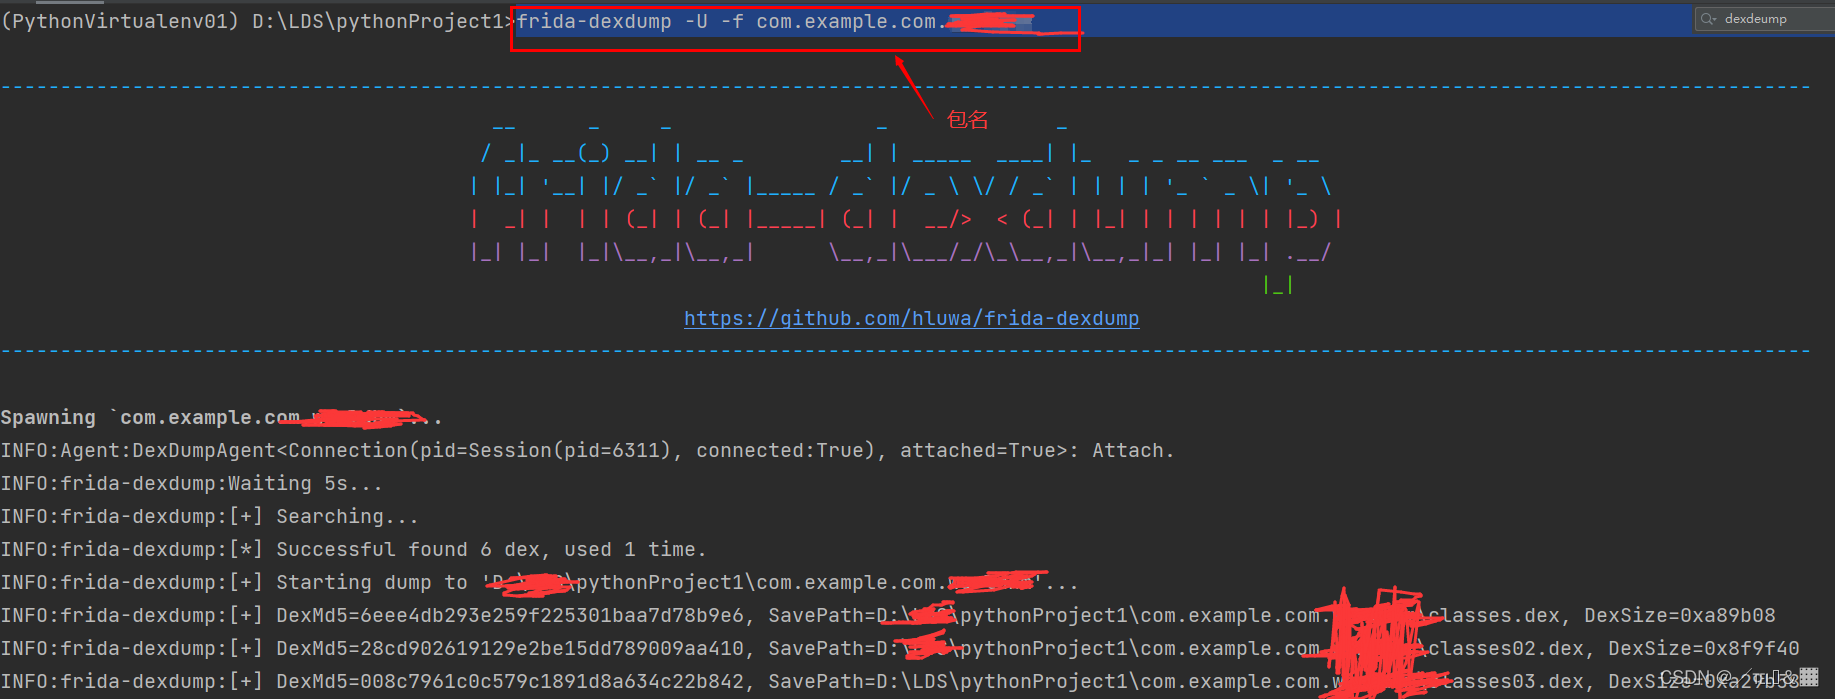
pip3 install frida-dexdump
下载后运行,在手机端点击启动app,app启动后,pc端运行python3 main.py
选择进程(双进程一般是防止ida,gdb等程序挂载),这里选择12597,直接输入1,一般选择高进程,猜测原因是壳的保护进程优先启动,被保护的进程后启动 安装
1. 基于frida-tools 的CLI 参数,您可以像这样快速转储前台应用程序,使用时,我建议使用该-d, --deep-search选项,这可能会花费更多时间,但结果会更完整。
frida-dexdump -FU
或者
frida-dexdump -U -f com.app.pkgname
2. 运行frida-dexdump脚本的main文件
https://github.com/hluwa/FRIDA-DEXDump


python3 main.py
或者
python3 frida_dexdump/main.py -n packagename

生成的dex文件会在frida_dexdump下面的packagename下
3.运行自己的hook脚本 ,最后导出dex
python3 my_hook_script.py4. objection plugin
由于FRIDA-DEXDump支持objection plugin
所有也可以进入obection后
4.1 加载dexdump,使用:
plugin load /Users/wuxianyu/Desktop/TotalProject/FRIDA-DEXDump-master/frida_dexdump4.2 搜素dexdump加载在内存汇中的dex文件,把这些dex文件给他保存下载
plugin dexdump search
plugin dexdump  dump
4.3 我们打开存储路径文件夹
如何确定哪个dex文件就是我们想找的dex呢
这时我们用obection去查找和包名相关的类(这个类是内存中真实加载的类,不会被混淆)
然后我们再在这写dex文件里面找找
大致的类
比如使用 grep BlackListActivity *.so
多找几次,对比下,最终dex文件是哪个
5. 解压对比查找法
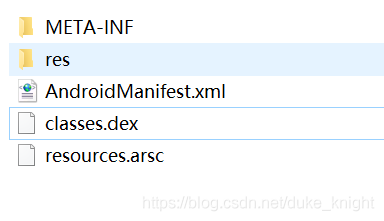
解压apk包
将xxx.apk 的后缀改成 xxx.zip ,然后解压,会得到如下文件
dex2jar 下载后进行加压,会得到一个 文件夹,然后将 上图中的 classes.dex 复制到 解压后的文件夹下。
打开cmd,并找到该文件夹, 执行 d2j-dex2jar.bat classes.dex 命令。
执行命令后,会得到一个名叫 classes-dex2jar.jar 的文件。
使用 jd_gui 打开该文件(如果项目没有混淆,看到的,应该就是正常的代码,如果混淆过,可能看到就不是正常的代码)。
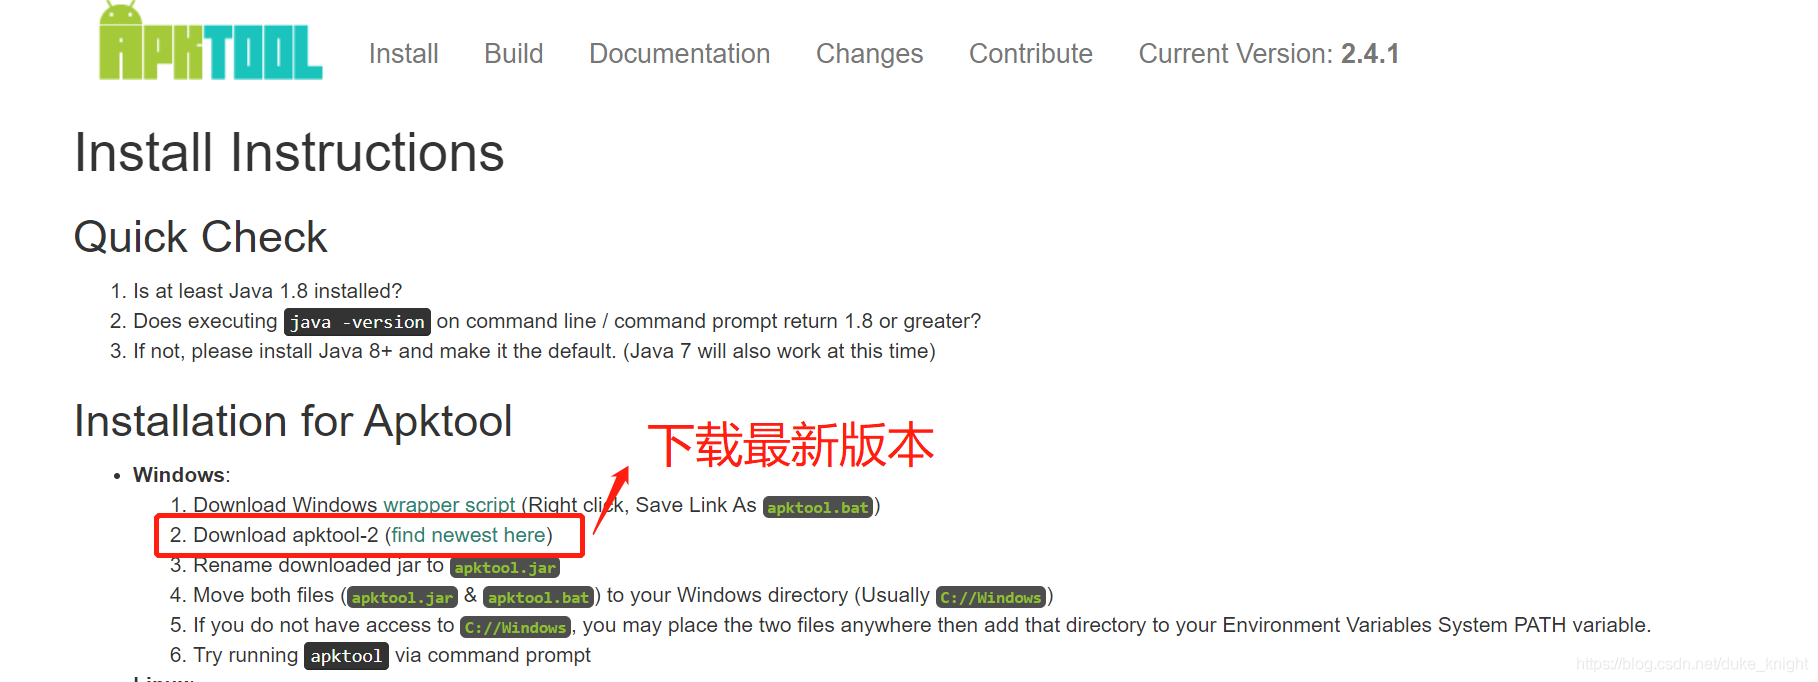
混淆后 查看 xml 与 AndroidManifest 文件,打开会是乱码,接着就使用 apktool 进行逆向,得到资源文件1.将 下载的jar包与 apk 包放在同一个文件夹中,
2.执行命令 java -jar apktool_2.4.1.jar d app-release.apk // 注意此处 apktool_2.4.1 为你下载的 apktool jar包 的 名字。
3. 执行命令后会得到
在 app-release 里 打开 布局文件与 AndroidManifest 文件 就能正常展示了。


 469
469


 被折叠的 条评论
为什么被折叠?
被折叠的 条评论
为什么被折叠?
 到【灌水乐园】发言


