

Introduction: IoT: Raspberry Pi Robot With Video Streamer and Pan/Tilt Camera Remote Control Over Internet


This Instructable was one of the winners of 2016 AUTOMATION Contest. Thanks a lot for all votes! ;-)
This is a second part of my previous Intructable: IoT - Controlling a Raspberry Pi Robot over internet with HTML and shell scripts only. There you learn how to control DC motors over the internet. Here we will learn how to streaming video using a PiCam and also remote controlling its position (Pan/Tilt), using servo motors. Controlling a camera over the internet can have several utilities, including for security use. As a particular example, we will install the camera and servos at the robot developed on the first part of the project.
The video bellow will give you an idea about how the final project looks like:
The block diagram shows the idea of the project. The RPi will be set as a WebServer and will receive commands from an HTML page. Those commands will control the GPIOs, making the RPi position the PiCam via the servo motors (Pan/Horizontal and Tilt/Vertical position).
Step 1: Bill of Material
- Raspberry Pi model 2 or 3
- Servo Motors (2x)
- 6V battery for servo motors
- 5V battery for RPi
- Protoboard
- Wirings
- Plastic or metal support for camera and plastic joints
- DC Motors and Robot car structure (as described on part 1)
Step 2: Video Streamer

We will install the PiCam video streamer based on the tutorial:
Raspberry Pi camera board video streaming, developed by Miguel Mota (please, refer to the January, 19th update).
First, let's update and upgrade the OS:
sudo apt-get update
sudo apt-get upgrade
Install dev version of libjpeg:
sudo apt-get install libjpeg62-turbo-dev (Note: libjpeg62-dev is obsolete and was replace by this one)
Install make:
sudo apt-get install cmake
Download mjpg-streamer with raspicam plugin:
git clone https://github.com/jacksonliam/mjpg-streamer.git ~/mjpg-streamer
Change directory:
cd ~/mjpg-streamer/mjpg-streamer-experimental
Compile:
make clean all
Replace old jpg-streamer:
sudo rm -rf /opt/mjpg-streamer
sudo mv ~/mjpg-streamer/mjpg-streamer-experimental /opt/mjpg-streamer
sudo rm -rf ~/mjpg-streamer
Begin streaming:
LD_LIBRARY_PATH=/opt/mjpg-streamer/ /opt/mjpg-streamer/mjpg_streamer -i "input_raspicam.so -fps 15 -q 50 -x 640 -y 480" -o "output_http.so -p 9000 -w /opt/mjpg-streamer/www" &
At Monitor you can see the valuing info:
MJPG Streamer Version.: 2.0
i: fps.............: 15
i: resolution........: 640 x 480
i: camera parameters..............:
Sharpness 0, Contrast 0, Brightness 50, Saturation 0,
ISO 400, Video Stabilisation No, Exposure compensation 0
Exposure Mode 'auto', AWB Mode 'auto',
Image Effect 'none', Metering Mode 'average',
Colour Effect Enabled No with U = 128, V = 128
Rotation 0, hflip No, flip No
www-folder-path...: /opt/mjpg-streamer/www/
HTTP TCP port.....: 9000
username:password.: disabled
commands..........: enabled
Starting Camera
Encoder Buffer Size 81920
The camera should be working. Go to your Web Browser and enter:
http://Your Ip Address:9000/stream.html
A test webpage as the one above should appear. Note that if you want change the PORT, change the "9000" parameter for the one that works better for you (in the command line entered at RPi Monitor). Observe that we are working with 15 frames per second (fps) and a resolution of 640x480. You can also change those parameters in the command line.
You must re-enter the command line above to start streaming any time that your system re-boot, unless you include it at the /etc/rc.local script, as bellow:
sudo nano /etc/rc.local
...
LD_LIBRARY_PATH=/opt/mjpg-streamer/ /opt/mjpg-streamer/mjpg_streamer -i "input_raspicam.so -fps 15 -q 50 -x 640 -y 480" -o "output_http.so -p 9000 -w /opt/mjpg-streamer/www" &
...
Step 3: Installing a WebServer

If you have went thru the first part of this project, you must have the LIGHTTPD WebServer already installed.
If not, the bellow steps will guide you in how install LIGHTTPD, a very “light” and fast WebServer that can be used instead of Apache for example. As described on its lighttpd wiki page, “Lighttpd is a secure, fast, compliant, and very flexible web-server that has been optimized for high-performance environments. It has a very low memory footprint compared to other WebServers and takes care of cpu-load.
Let's install Lighttpd web server and components:
sudo apt-get -y install lighttpd
sudo lighttpd-enable-mod cgi
sudo lighttpd-enable-mod fastcgi
By default, Lighttpd is looking for a index.html page at /var/www/html. We will change it, so the index.html will be placed under /var/www. For that, we must edit the Lighted config file:
sudo nano /etc/lighttpd/lighttpd.conf
change:
server.document-root =“/var/www/html”
by:
server.document-root =“/var/www/”
In order to aloud this change to take effect, we must stop and re-start the web server:
sudo /etc/init.d/lighttpd stop
sudo /etc/init.d/lighttpd start
At this point the web server is running and if a page index.html is located at /var/www, we can access it from any browser, typing the RPi IP address:
in order to create a single webpage to show the video, let's include the bellow line at the HTML code:
<xmp>

<iframe src="http://Your IP Adress:9000/javascript_simple.html" frameborder="0" align="middle" width="640" height="480" align="middle" scrolling="no">$


</xmp>
Bellow you can see the complete HTML code for the page, where the video are streaming, The above photo shows the webpage print screen:
<xmp>

<html>
<head>
</head>

<style>
body {background-color: lightyellow}
h1 {color:blue}


</style>

<body>

<div style="text-align:center">

<h1> MJRoBot RPi Web Robot Control   <img style="height: 100px"src="/images/robot52.png"> </h1>
<br><br>

<iframe src="http://10.0.1.31:9000/javascript_simple.html" frameborder="0" align="middle" width="640" height="480" align="middle" scrolling="no">$


</body>
</html>

</xmp>
Step 4: ServoBlaster Installation
A greta library to be used to control servos is ServoBlaster
This is software for the RaspberryPi, which provides an interface to drive multiple servos via the GPIO pins. You control the servo positions by sending commands to the driver saying what pulse width a particular servo output should use. The driver maintains that pulse width until you send a new command requesting some other width.
By default is it configured to drive 8 servos, although you can configure it to drive up to 21. Servos typically need an active high pulse of somewhere between 0.5ms and 2.5ms, where the pulse width controls the position of the servo. The pulse should be repeated approximately every 20ms, although pulse frequency is not critical. The pulse width is critical, as that translates directly to the servo position.
In addition to driving servos, ServoBlaster can be configured to generate pulse widths between 0 and 100% of the cycle time, making it suitable for controlling the brightness of up to 21 LEDs, for example.
The driver creates a device file, /dev/servoblaster, in to which you can send commands. The command format is either
[servo-number]=[servo-position]
(ex.: echo P1-11=80% >/dev/servoblaster)
or
P[header]-[pin]=[servo-position]
(ex: echo P0=80% >/dev/servoblaster)
First, let's clone Richardghirst project from GITHUB:
cd
sudo git clone https://github.com/richardghirst/PiBits
Change dir:
cd PiBits
cd ServoBlaster
cd user
List the content and verify if the directory contains the file "servod.c"
ls
Compile and install the file served.c:
sudo make servod
sudo make install
At this moment, the program servod must be installed. Change the permissions and run the program to test it:
sudo chmod 755 servod
sudo ./servod
If everything is OK, you can see at the monitor, the following information:
Board model:                     2
GPIO configuration:            P1 (40 pins)
Using hardware:                PWM
Using DMA channel:              14
Idle timeout:             Disabled
Number of servos:                8
Servo cycle time:            20000us
Pulse increment step size:      10us
Minimum width value:            50 (500us)
Maximum width value:           250 (2500us)
Output levels:              Normal

Using P1 pins:               7,11,12,13,15,16,18,22

Servo mapping:
     0 on P1-7           GPIO-4
     1 on P1-11          GPIO-17
     2 on P1-12          GPIO-18
     3 on P1-13          GPIO-27
     4 on P1-15          GPIO-22
     5 on P1-16          GPIO-23
     6 on P1-18          GPIO-24
     7 on P1-22          GPIO-25
Note the servo Mapping above. We will only need 2 servos, so we must restrict the pins to be used. Let's consider:
- GPIO.17 (P1-11) will be used for TILT
- GPIO.23 (P1-16) will used for PAN
To define the pins to be used, the bellow parameters must be used:
sudo ./servod --p1pins=11,16
Running the above command, the monitor will now show in its lower part:
Using P1 pins: 11,16
Servo mapping:
0 on P1-11 GPIO-17
1 on P1-16 GPIO-23
Also note that if you reboot the RPi, the configuration will l be lost, so. it's important to include the last command at /etc/rc.local
sudo nano /etc/rc.local
...
cd /home/pi/PiBits/ServoBlaster/user
sudo ./servod --p1pins=11,16
cd
...
Also it is important change the script bellow:
sudo nano /etc/init.d/servoblaster
...
case "$1" in
start)
/usr/local/sbin/servod $OPTS >/dev/null
change to:
/usr/local/sbin/servod --p1pins=11,16 $OPTS >/dev/null
...
        ;;        ;;#!/bin/sh
### BEGIN INIT INFO
# Provides:          servoblaster
# Required-Start:    hostname $local_fs
# Required-Stop:
# Should-Start:
# Default-Start:     2 3 4 5
# Default-Stop:      0 1 6
# Short-Description: Start/stop servod.
# Description:       This script starts/stops servod.
### END INIT INFO

PATH=/sbin:/usr/sbin:/bin:/usr/bin
. /lib/init/vars.sh

OPTS="--idle-timeout=2000"

STATUSFILE="/tmp/servoblaster-status"

if [ $( id -u ) != 0 ]; then
        echo "ERROR: Must be run as root"
        exit 1
fi

case "$1" in
  start)
        /usr/local/sbin/servod --p1pins=11,16 $OPTS >/dev/null<br>        ;;
  restart|reload|force-reload)
        killall servod
        /usr/local/sbin/servod $OPTS >/dev/null
        ;;
  stop)
        killall servod
        ;;
  status)
        if [ ! -e /dev/servoblaster ]; then
                echo "ERROR: /dev/servoblaster does not exist"
                exit 2
        fi
        rm -f $STATUSFILE
        echo "status $STATUSFILE" > /dev/servoblaster
        sleep 0.2
        if [ ! -e $STATUSFILE ]; then
                echo "ERROR: servod not responding"
                exit 3
        elif grep -q "^OK" $STATUSFILE; then
                echo "OK"
                exit 0
        elif grep "^ERROR:" $STATUSFILE; then
                exit 4
        else
                echo "ERROR: No status from servod"
                exit 5
        fi
        ;;
  *)
        echo "Usage: servoblaster [start|stop|status]" >&2
        exit 6
        ;;
esac

exit 0
now reboot your system, so the changes can be permanent
sudo reboot
That's it. Servo blaster is installed. Note that at this point ServoBlaster will recognize only two servos:
servo 0 ==> p1-11
servo 1==> 01-16
The echo command can be done on any one of the bellow formats, with same result:
echo P1-11=40% >/dev/servoblaster
echo P1-16=60% >/dev/servoblaster
or
echo 0=40% >/dev/servoblaster
echo 1=60% >/dev/servoblaster
Step 5: Assembling the PAN/Tilt Mechanism


There are several Pan/Tilt mechanisms at market, but I decide instead to assembly a very simple one, only tying the servos and the PiCam among them as you can see in the photos.
Step 6: Installing the Servos at RPi


- Connect the servos data signal to RPI as shown at diagram.
- Connect the +V of both servos on a separate power supplier than the RPi (of course, both GND must be connected). Once you will install the Pan/Tilt mechanism to the robot, you can use the same battery (9V) that was used with DC motors. In this case, a 6V Voltage regulator will be necessary.
For testing the servos, use the Servoblaster command "echo". You can use angle values or percentage. Test the best range for your Pan/Tilt mechanism:
Tilt Servo Range:
echo P1-11=20% >/dev/servoblaster (looking down)
echo P1-11=60% >/dev/servoblaster (looking front)
echo P1-11=90% >/dev/servoblaster (looking up)
Pan Servo Range:
echo P1-16=30% >/dev/servoblaster (looking right)
echo P1-16=62% >/dev/servoblaster (looking center)
echo P1-16=90% >/dev/servoblaster (looking left)
We can write bash scripts to control the servo's position easily. Before start, let's remember that is a good practice to have a specific directory for the programs used and call it “bin”. So, to save the scripts that we will use in the project, we will create an directory that will containing all executable scripts (or binary files).
For example, let's move for our webpage directory:
cd /var/www
and under it, create the directory with the scripts, that we will call cgi-bin:
sudo mkdir /var/www/cgi-bin
For the scripts, we will use ".cgi" as the file extension. CGI means “Common Gateway Interface”. It is a standard way for web servers to interface with executable programs installed on a server that generate web pages dynamically. Such programs are known as CGI scripts or simply CGIs; they are usually written in a scripting language, but can be written in any programming language. Let's create a directory under /var/www, where the scripts will be saved:
sudo mkdir cgi-bin
As we discussed on the first part of this project, IoT - Controlling a Raspberry Pi Robot over internet with HTML and shell scripts only. script's files are essentially plain text. When a text file is attempted to be executed, shells will parse through them for clues as to whether they’re scripts or not, and how to handle everything properly. Because of this, there are a few guidelines you need to know.
- Every script should being with “#!/bin/bash” (The Hash-Bang Hack}
- Every new line is a new command
- Comment lines start with a #
- Commands are surrounded by ()
When a shell parses through a text file, the most direct way to identify the file as a script is by making your first line: #!/bin/bash (The Hash-Bang Hack). If you use another shell, substitute its path here. Comment lines start with hashes (#), but adding the bang (!) and the shell path after it is a sort of hack that will bypass this comment rule and will force the script to execute with the shell that this line points to.
For example, to create a shell script to position the camera "looking to front", based on the above servo ranges that you found, we must create the file bellow (use the best editor for you. I am using NANO for that):
sudo nano cam_view_front.cgi
#!/bin/bash
echo P1-11=60% >/dev/servoblaster
echo P1-16=62% >/dev/servoblaster
.
Once the script is created, we must give it permission to be executed:
sudo chmod 755 cam_view_front.cgi
Now, to execute the script:
./cam_view_front.cgi
Move the camera for any position using echo command and after that execute the new script. You will see that the camera will be poisoned automatically its front view position.
Going on, the same idea must be applied for the other possible Camera positions.
For my webpage, I choose to create 5 intermediary positions for Tilt and 5 intermediary positions for PAN. You can also chose to use "sliders" for a more continuous position change. It's up to you.
Using the same principle as described for the script "cam_view_front.cgi", we will create 10 new scripts:
- leftpan.cgi ==> 90%
- leftcenterpan.cgi ==> 76%
- centerpan.cgi ==> 62%
- rightcenterpan.cgi ==> 46%
- rightpan.cgi ==> 30%
- downtilt.cgi ==> 20%
- downcentertilt.cgi ==> 40%
- centertilt.cgi ==> 60%
- upcentertilt.cgi ==> 75%
- uptilt.cgi ==> 90%
Step 7: Creating an HTML Page to Control the Camera


Using the index.html that we created in the last step, let’s include 10 buttons that will call functions to execute the scripts created on last step (see the final page above).
For example, let’s create a button to position the camera on its central TILT position:
<xmp>
button {
        color: blue;
        background:lightgrey;
        border: 1px solid #000;
        border-radius: 8px;
        position: center;
}
         ...

<button style="height: 50px; width: 100px; font-size: 25px" onclick="centertilt()">0</button>
         ...
</xmp>
The above HTML code will create a rounded button with an "0" on it (see the final page above).
When the button is pressed, due the command “onclick=centertilt()”, the function “centertilt() is called:
<xmp>
function centertilt()
{
    xmlhttp.open("GET","cgi-bin/centertilt.cgi",true);
    xmlhttp.send();
}</xmp>
And once the function centertilt() is called, the script centertilt.cgi is executed and the servo will move to center position.
The same procedure must be used for all buttons. There are some HTML functions that will organize the look&fill that you can realize looking the full HTML page. The HTML source can be seen bellow:
<xmp>
<html>
<head>
</head>

<style>
body {background-color: lightyellow}
h1 {color:blue}

button {
        color: blue;
        background:lightgrey;
        border: 1px solid #000;
        border-radius: 8px;
        position: center;
}

</style>

<body>

<div style="text-align:center">

<h1> MJRoBot RPi Web Robot Control   <img style="height: 100px"src="/images/robot52.png"> </h1>
<br><br>

<iframe src="http://10.0.1.31:9000/javascript_simple.html" frameborder="0" align="middle" width="640" heigh$
<br><br>

<span style="display:inline-block;padding:5px;border:1px solid #fc0; font-size: 140%;font-weight: bold;">

        <p>Camera Tilt Angle</p>
        <img hspace="18" style="padding-left: 5px">
        <button style="height: 50px; width: 100px; font-size: 25px" onclick="downtilt()">-D</button>
        <button style="height: 50px; width: 100px; font-size: 25px" onclick="downcentertilt()">D</button>
        <button style="height: 50px; width: 100px; font-size: 25px" onclick="centertilt()">0</button>
        <button style="height: 50px; width: 100px; font-size: 25px" onclick="upcentertilt()">U</button>
        <button style="height: 50px; width: 100px; font-size: 25px" onclick="uptilt()">U+</button>
        <img hspace="18" style="padding-left: 5px">
        <br><br>
        <p>Camera Pan Position</p>
        <button style="height: 50px; width: 100px; font-size: 25px" onclick="leftpan()">+L</button>
        <button style="height: 50px; width: 100px; font-size: 25px" onclick="leftCenterPan()">L</button>
        <button style="height: 50px; width: 100px; font-size: 25px" onclick="centerpan()">0</button>
        <button style="height: 50px; width: 100px; font-size: 25px" onclick="rightCenterPan()">R</button>
        <button style="height: 50px; width: 100px; font-size: 25px" onclick="rightpan()">R+</button>
        <p></p>
</span>

<script>
var xmlhttp;
xmlhttp=new XMLHttpRequest();


function downtilt()
{
    xmlhttp.open("GET","cgi-bin/downtilt.cgi",true);
    xmlhttp.send();
}
function downcentertilt()
{
    xmlhttp.open("GET","cgi-bin/downcentertilt.cgi",true);
    xmlhttp.send();
}function centertilt()
{
    xmlhttp.open("GET","cgi-bin/centertilt.cgi",true);
    xmlhttp.send();
}
function upcentertilt()
{
    xmlhttp.open("GET","cgi-bin/upcentertilt.cgi",true);
    xmlhttp.send();
}
function uptilt()
{
    xmlhttp.open("GET","cgi-bin/uptilt.cgi",true);
    xmlhttp.send();
}
function leftpan()
{
    xmlhttp.open("GET","cgi-bin/leftpan.cgi",true);
    xmlhttp.send();
}
function leftCenterPan()
{
    xmlhttp.open("GET","cgi-bin/leftCenterPan.cgi",true);
    xmlhttp.send();
}
function centerpan()
{
    xmlhttp.open("GET","cgi-bin/centerpan.cgi",true);
    xmlhttp.send();
}function rightCenterPan()
{
    xmlhttp.open("GET","cgi-bin/rightCenterPan.cgi",true);
    xmlhttp.send();
}
function rightpan()
{
    xmlhttp.open("GET","cgi-bin/rightpan.cgi",true);
    xmlhttp.send();
}

</script>

</body>
</html>
</xmp>
Step 8: Let's Integrate Camera, Servos and Motors


Now that we have our RPI streaming video and its camera position can be controlled via internet, why not to integrate this project with the previous one?
The complete idea will be a RPi Robot controlled by internet. The block diagram shows how the project can be integrated and the circuit show how to make the connections.
Let's take the webpage developed here (index.html) and add the motor control buttons (and its respective functions) developed at first part of this project.
<xmp>
<html>
<head>
</head>

<style>
body {background-color: lightyellow}
h1 {color:blue}

button {
	color: blue;
	background:lightgrey;
	border: 1px solid #000;
	border-radius: 8px;
	position: center;
}

</style>

<body>

<div style="text-align:center">

<h1> MJRoBot RPi Web Robot Control   <img style="height: 100px"src="/images/robot52.png"> </h1>
<br><br>

<iframe src="http://10.0.1.31:9000/javascript_simple.html" frameborder="0" align="middle" width="640" height="480" align="middle" scrolling="no"></iframe>
<br><br>

<button style="height: 50px; width: 100px" onclick="lighton()"><img style="height: 40px"src="/images/lighton.png"></button>
<img hspace="20" style="padding-left: 200px">
<button style="height: 50px; width: 100px" onclick="lightoff()"><img style="height: 35px"src="/images/lightoff.png"></button>
<br><br>

<span style="display:inline-block;padding:5px;border:1px solid #fc0; font-size: 140%;font-weight: bold;">
	<br>
	<button style="height: 75px; width: 75px" onclick="forward()"><img style="height: 65px"src="/images/forward.png"></button>
	<br><br><br><br>
	<img hspace="10" style="padding-left: 5px">
	<button style="height: 75px; width: 75px" onclick="left()"><img style="height: 65px"src="/images/left.png"></button>
	<img hspace="20" style="padding-left: 10px">
	<button style="height: 75px; width: 75px" onclick="stop()"><img style="height: 63px"src="/images/stop.png"></button>
	<img hspace="20" style="padding-left: 10px">
	<button style="height: 75px; width: 75px" onclick="right()"><img style="height: 65px"src="/images/right.png"></button>
	<img hspace="10" style="padding-left: 5px">
	<br><br><br><br>
	<button style="height: 75px; width: 75px" onclick="reverse()"><img style="height: 65px"src="/images/reverse.png"></button>
	<br><br><br>

	<p>Motor speed control</p>
	<img hspace="30" style="padding-left: 5px">
	<button style="height: 50px; width: 50px; font-size: 18px" onclick="nospeed()">0</button>
	<img hspace="30" style="padding-left: 20px">
	<button style="height: 50px; width: 50px; font-size: 18px" onclick="lowspeed()">--</button>
	<img hspace="30" style="padding-left: 20px">
	<button style="height: 50px; width: 50px; font-size: 18px" onclick="regularspeed()">==</button>
	<img hspace="30" style="padding-left: 20px">
	<button style="height: 50px; width: 50px; font-size: 18px" onclick="highspeed()">++</button>
	<img hspace="30" style="padding-left: 5px">
	<br><br>
</span>
<br><br>

<span style="display:inline-block;padding:5px;border:1px solid #fc0; font-size: 140%;font-weight: bold;">

        <p>Camera Tilt Angle</p>
        <img hspace="18" style="padding-left: 5px">
	<button style="height: 50px; width: 100px; font-size: 25px" onclick="downtilt()">-D</button>
        <button style="height: 50px; width: 100px; font-size: 25px" onclick="downcentertilt()">D</button>
        <button style="height: 50px; width: 100px; font-size: 25px" onclick="centertilt()">0</button>
        <button style="height: 50px; width: 100px; font-size: 25px" onclick="upcentertilt()">U</button>
        <button style="height: 50px; width: 100px; font-size: 25px" onclick="uptilt()">U+</button>
        <img hspace="18" style="padding-left: 5px">
	<br><br>
        <p>Camera Pan Position</p>
        <button style="height: 50px; width: 100px; font-size: 25px" onclick="leftpan()">+L</button>
        <button style="height: 50px; width: 100px; font-size: 25px" onclick="leftCenterPan()">L</button>
        <button style="height: 50px; width: 100px; font-size: 25px" onclick="centerpan()">0</button>
        <button style="height: 50px; width: 100px; font-size: 25px" onclick="rightCenterPan()">R</button>
        <button style="height: 50px; width: 100px; font-size: 25px" onclick="rightpan()">R+</button>
        <p></p>
</span>

<script>
var xmlhttp;
xmlhttp=new XMLHttpRequest();

function lighton()
    {
        xmlhttp.open("GET","cgi-bin/lighton.cgi",true);
        xmlhttp.send();
    }
function lightoff()
    {
        xmlhttp.open("GET","cgi-bin/lightoff.cgi",true);
        xmlhttp.send();
    }
function forward()
{
	xmlhttp.open("GET","cgi-bin/forward.cgi",true);
	xmlhttp.send();
}
function stop()
{
	xmlhttp.open("GET","cgi-bin/stop.cgi",true);
	xmlhttp.send();
}
function left()
{
	xmlhttp.open("GET","cgi-bin/left.cgi",true);
	xmlhttp.send();
}
function right()
{
	xmlhttp.open("GET","cgi-bin/right.cgi",true);
	xmlhttp.send();
}
function reverse()
{
	xmlhttp.open("GET","cgi-bin/reverse.cgi",true);
	xmlhttp.send();
}

function lowspeed()
{
	xmlhttp.open("GET","cgi-bin/lowspeed.cgi",true);
	xmlhttp.send();
}
function regularspeed()
{
	xmlhttp.open("GET","cgi-bin/regularspeed.cgi",true);
	xmlhttp.send();
}
function highspeed()
{
	xmlhttp.open("GET","cgi-bin/highspeed.cgi",true);
	xmlhttp.send();
}
function nospeed()
{
	xmlhttp.open("GET","cgi-bin/nospeed.cgi",true);
	xmlhttp.send();
}


function downtilt()
{
    xmlhttp.open("GET","cgi-bin/downtilt.cgi",true);
    xmlhttp.send();
}
function downcentertilt()
{
    xmlhttp.open("GET","cgi-bin/downcentertilt.cgi",true);
    xmlhttp.send();
}
function centertilt()
{
    xmlhttp.open("GET","cgi-bin/centertilt.cgi",true);
    xmlhttp.send();
}
function upcentertilt()
{
    xmlhttp.open("GET","cgi-bin/upcentertilt.cgi",true);
    xmlhttp.send();
}
function uptilt()
{
    xmlhttp.open("GET","cgi-bin/uptilt.cgi",true);
    xmlhttp.send();
}
function leftpan()
{
    xmlhttp.open("GET","cgi-bin/leftpan.cgi",true);
    xmlhttp.send();
}
function leftCenterPan()
{
    xmlhttp.open("GET","cgi-bin/leftCenterPan.cgi",true);
    xmlhttp.send();
}
function centerpan()
{
    xmlhttp.open("GET","cgi-bin/centerpan.cgi",true);
    xmlhttp.send();
}
function rightCenterPan()
{
    xmlhttp.open("GET","cgi-bin/rightCenterPan.cgi",true);
    xmlhttp.send();
}
function rightpan()
{
    xmlhttp.open("GET","cgi-bin/rightpan.cgi",true);
    xmlhttp.send();
        }

</script>

</body>
</html>
</xmp>
Above you can see the final integrated webpage.
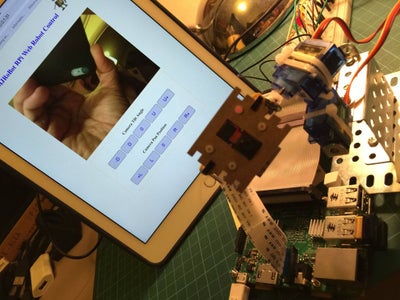
Step 9: The Complete RPi Robot Is Alive


Let's have the Pan/Tilt camera mechanism integrated to the robot.
The video bellow explains how its works:
Step 10: Conclusion

The complete files and documents used on this Instructable can be found at GITHUB:
https://github.com/Mjrovai/MJRoBot-Web-RPi-Robot
As always, I hope this project can help others find their way in the exciting world of electronics, robotics, Raspberry Pi and IoT!
For more projects, please visit my blog:
Saludos from the south of the world!
See you at my next instractable!
Thank you
Marcelo

Runner Up in the
Automation Contest 2016

Participated in the
Internet of Things Contest 2016


